
Implementing Two-Tier PKI on Windows Server 2022 – Part 6
Active Directory Certificate Services offers numerous predefined templates for various uses. We’ll explore some of these templates, customize them, and discuss best practices.
Key Points for Certificate Templates:
- Always create a duplicate of the default template and modify the duplicate (examples in Part 4 of the PKI series).
- Name duplicates descriptively to understand their purpose in the future.
- Review security settings and optimize them for your needs; default settings (SHA1) are not adequate.
- Restrict access to users/groups who need it and only for specific templates.
- Avoid auto-enrollment for important certificates.
- Delete unnecessary templates and avoid issuing certificates you don’t intend to use.
Available Templates:
We’ll modify the User, Computer, and Web Server templates for domain use, as these are the most commonly used in my environment. Smartcard configurations are less frequent but sometimes necessary.
User Certificate Template Creation
Note: Users must have emails entered in their AD accounts to avoid errors when issuing user certificates.
- Open Certificate Authority Console (certsrv.msc), right-click on Certificate Templates, and select Manage.
- Duplicate the User Template:
- Right-click the User Template and select Duplicate Template.
- Compatibility Tab:
- Set Certificate Authority to Windows Server 2016 and Certificate recipient to Windows 10 / Windows Server 2016.
- General Tab:
- Template display name: Add domain FQDN (e.g., User pwoks.local).
- Validity: 1 year, Renewal: 6 weeks.
- Check “Publish certificate in AD” and “Do not automatically reenroll”.

- Request Handling Tab:
- Purpose: Signature and encryption.
- Enable “Include symmetric algorithms” and “Archive subjects encryption private key” (confirm pop-up).
- Allow private key to be exported and renew with the same key.

- Cryptography Tab:
- Provider Category: Key Storage Provider.
- Algorithm: RSA, Minimum key size: 4096, Request hash: SHA256.
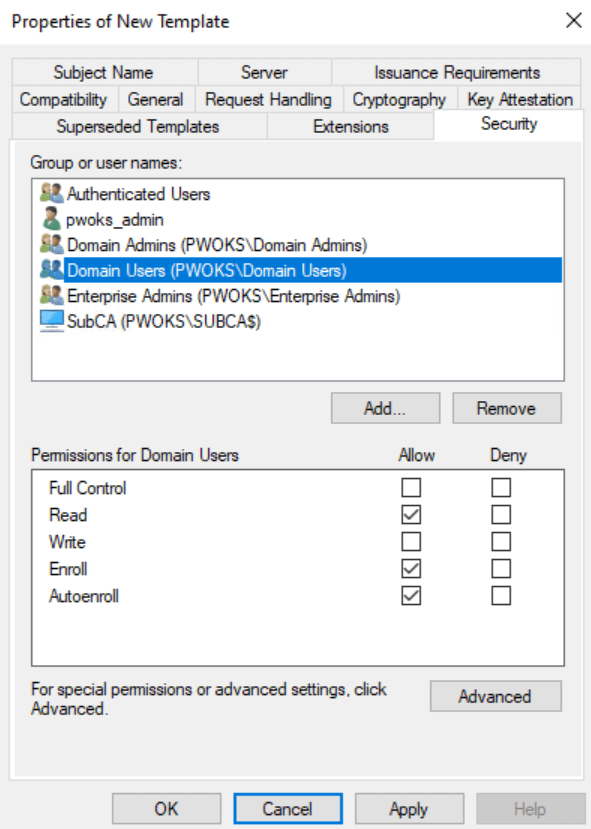
- Security Tab:
- Add SUBCA server as computer
- Domain users: Read, Enroll, Autoenroll.
- SUBCA: Read, Enroll.
- Apply, OK, and close the Certificate Template window.

- Enable the Template:
- In the Certificate Authority console, right-click on Certificate Templates, New, Certificate Template to Issue.
- Select the User pwoks.local template and press OK.


User Certificate Auto-Enrollment
Auto-Enrollment allows users within the pwoks.local domain to automatically receive certificates from AD CS. We’ll use the template defined above. First, go to DC and open the Group Policy Management Console (gpmc.msc).
I have a Domain Users OU where I place my domain users. We’ll create a new GPO for this.
Right-click on Domain Users (or your specific OU) and select “Create a GPO in this domain, and Link it here…”. Name the policy “User Cert Enroll” and press OK without changing any other settings.

A new GPO named UserCertEnroll is created under Domain Users. Right-click on it and select Edit.

Navigate to User Configuration | Policies | Windows Settings | Security Settings. Click on Public Key Policies. Select Certificate Services Client – Certificate Enrollment Policy, right-click on it, and select Properties. Enable Configuration Model and Click OK.

Next, select Certificate Services Client – Auto-Enrollment, right-click, and select Properties.
In the Configuration Model, select Enabled. Ensure that “Renew expired certificates, update pending certificates…” and “Update certificates that use certificate templates” are selected/enabled. Leave everything else as default. Apply and OK.

We can now close the Group Policy Management Console.
Next, open the Local User Certificate Store on the Client machine (Windows 11 with a domain user) before configuring the group policy. Start certmgr.msc on Client and check the Personal store – it should be empty.
If you don’t receive a certificate for PwoksUser after some time, the reason is mostly a missing email. On the SUBCA server in the Certification Authority console, you can see that the certificate is denied due to the missing email. Add an email for PwoksUser.

If you try to reissue the certificate from the Certification Authority console on SUBCA after adding the email (by right-clicking on it), you will get the error “The request is missing a required private key for archival by the server error 0x80094804”. Instead, simply reboot the Client machine and log in with PwoksUser. This will issue a new certificate.
After rebooting the Client machine and logging in again with WinUser1, you should now see a valid certificate.

You can also see this certificate on SUBCA in the Certification Authority console under Issued Certificates.

With this, our user certificates are auto-enrolled using the User pwoks.local template.
User Certificate Private Key Recovery
If you use User certificates, be aware that losing the private key can lead to the loss of encrypted files, emails, and VPN access. While you can issue a new private key to the user, you won’t be able to access content encrypted with the old key.
We have already set up private key recovery in previous parts and added the option to archive keys in the User Template. Let’s go through the process of recovering a user’s private key.
I created a PwoksUser2 account, which is logged into the Client machine. We will now attempt to recover the private key for PwoksUser2.
On the SUBCA server, create a directory at C:\CertRecover.
Open the Certification Authority console (certsrv.msc) and expand the console until you see the Issued Certificates folder. To recover the key for PwoksUser2, right-click on it and select Open.

Find the Serial number field and copy the serial number.

Open PowerShell as an administrator and navigate to the C:\CertRecover directory.
Type in the following command, replacing “serialnumber” with the serial number you retrieved and “username” with the user who lost the key.
certutil -getkey serialnumber username
This is how it looks in my case:

Now, we have one file in the C:\CertRecover folder. We will convert it to a .pfx file with the following command, replacing “PwoksUser2” with the username you used in the first command.
certutil.exe -recoverkey .\PwoksUser2 PwoksUser2.pfx
You will be asked for a password to protect the key. Enter it and remember it.

Now, in C:\CertRecover on SUBCA, you can see the private key for PwoksUser2. Copy it to their PC and import it by right-clicking on the Personal store and selecting Import in certmgr.msc.

It is crucial to store these certificates safely and securely.
Computer Certificate Template Creation
Next, we will create a Computer Certificate Template, primarily used for machines with applications such as disk encryption, 802.1x authentication, VPN, and MDM management.
This certificate is separate from the User Certificate.
The following steps are performed on SUBCA, following the same procedure as in the User Certificate example.
First, duplicate the Computer Template.

In the Compatibility tab, set the Certificate Authority to Windows Server 2016 and the Certificate recipient to Windows 10 / Windows Server 2016.
In the General tab, rename the Template, set the Validity to 1 year, Renewal to 6 weeks, and enable “Publish certificate in Active Directory”.
In the Request Handling tab, set the Purpose to Signature and encryption, leaving everything else as default.
In the Cryptography tab, set the Provider to Key Storage Provider, Algorithm to RSA, Minimum key size to 4096, and Request hash to SHA256.
In the Security tab, add the SubCA computer (click Add, under Object types select Computers, enter the Computer Name, and add it) with Read and Enroll permissions. For Domain Computers, set Read, Enroll, and Autoenroll permissions.
Click Apply and OK to close the console.
Navigate to Certificate Templates, right-click, select New, Certificate Template to Issue, and select the template that we just created.

Press OK to close, and the template is now issued.
Computer Certificate Auto-Enrollment
To enable automatic certificate enrollment for our machines, we need to add a group policy rule. We’ll start on DC by adding a GPO to the DomainPCs OU.
First, open gpmc.msc. Right-click on DomainPCs, select “Create a GPO in this domain,” name it, and click OK. Then, right-click on the newly created GPO (CompCertEnroll) and select “Edit.”

Navigate to Computer Configuration | Policies | Windows Settings | Security Settings, and click on Public Key Policies. Select Certificate Services Client – Certificate Enrollment Policy, right-click on it, and select “Properties.”
Set the Configuration Model to “Enabled” and leave everything else as default. Click “Apply” and then “OK.”

Next, select Certificate Services Client – Auto-Enrollment, right-click, and select “Properties.”
In the Configuration Model, select “Enabled” and ensure that “Renew expired certificates, update pending certificates…” and “Update certificates that use certificate templates” are selected/enabled. Leave everything else as default. Click “Apply” and then “OK.”

This change will take some time to propagate. You can force a group policy update on the client machine by running gpupdate /force and rebooting the client machine. On the client machine, you can check if the certificate is added by running the local machine certificates snap-in (certlm.msc) and checking in the Personal store. On SUBCA, it can be seen in Issued Certificates in the Certification Authority console.

Web Server Certificate Template
As this guide is getting quite lengthy, this will be one of the last topics we cover in part 6.
A web server certificate can be used to enable SSL on IIS and manage Linux web servers. We covered the User Template in detail, so if you are missing any steps or are unsure how to navigate to a particular screen, refer to that guide. Here, we will mention only the important steps.
Right-click on the Web Server Template and select “Duplicate Template.”
By now, you should be familiar with the process.
In the Compatibility tab, set it to Windows Server 2016, Windows 10 / Windows Server 2016. In the General tab, rename the Template, set Validity to 1 year, and Renewal to 6 weeks. Leave everything else as is and do not enable anything additional.
In the Request Handling tab, set the Purpose to “Signature and encryption” and leave everything else as default. Keep the Legacy Cryptographic Service Provider, set the Algorithm to “Determined by CSP,” and the Minimum key size to 2048 (you can leave it at 2048 or change it to 4096). Leave everything else as is.

In the Security tab, add SUBCA (click Add, under Object types select Computers, enter the Computer Name, and Add it) with Read and Enroll permissions.
For Domain Admins, set Read, Write, Enroll, and Autoenroll permissions. Click “Apply” and “OK.” We are done with the Web Server Template; we just need to publish it now.
If you wish, you can add other groups that can request a Web Server certificate (IT department, developers, etc.); it does not have to be only Domain Admins.
Navigate to Certificate Templates, right-click, select “New,” then “Certificate Template To Issue,” and select the template we just created.

We are almost done.
If you need a web server certificate for Linux, I won’t be describing it here, you could reach at me or here are tutorials on that topic.
- How to create a certificate request on Linux
- Apache – How to install LAMP Stack
- Enable SSL on Apache / LAMP Stack
- Nginx – How to install LEMP Stack
We’ll stop here for now, as this guide is becoming too long. We will cover a few more topics regarding PKI on Windows Server in future parts, but for now, we have templates for users, computers, and web servers ready for our environment.