
In Part 1 of our guide on implementing a Two-Tier PKI on Windows Server 2022, we introduced the basics of PKI, set up the lab configuration, and established the offline Root CA. Now, in Part 2, we’ll dive deeper into configuring the Subordinate CA.
Introduction
Before proceeding, make sure you’ve read Part 1 to understand the context and setup. Remember, this guide is intended for testing and learning purposes only. I can’t be held responsible for any damage (financial, physical, emotional, etc.) that may result from following these steps. PKI is complex, so it’s crucial to have a solid understanding of the topic before you begin.
For lab setup and additional details, refer to Part 1 of the guide.
Subordinate CA Configuration
Our SubCA is already part of the pwoks.local domain. Let’s start configuring it. Important: Do not turn off the Root CA until the entire PKI implementation is complete!
DNS Configuration:
On your domain controller, in the DNS zone (e.g., pwoks.local), add the following CNAME records:
- OCSP.pwoks.local
- PKI.pwoks.local
For the alias name of the new CNAME record, enter OCSP (and for the second record, enter PKI). In the FQDN field of the CNAME record, enter SubCA.pwoks.local (the name and domain of the Subordinate CA) for both records.
This is how everything should look once configured.

If done correctly, pinging pki.pwoks.local or ocsp.pwoks.local from a client should resolve to the IP of the Subordinate CA.

Next, we’ll move on to configuring the Subordinate CA, named SubCA in this example.
Create CAPolicy.inf File:
Just like with the Root CA, create a CAPolicy.inf file and place it in the root directory of Windows (C:\Windows\CAPolicy.inf). If you have your PEN number, modify the OID line in the InternalPolicy section to OID=1.3.6.1.4.1.XX (where XX is your PEN number).
Here is the CAPolicy.inf file needed for the Subordinate CA.
[Version]
Signature=”$Windows NT$”
[PolicyStatementExtension]
Policies = AllIssuancePolicy, InternalPolicy
Critical = FALSE
[AllIssuancePolicy]
OID = 2.5.29.32.0
[InternalPolicy]
OID = 1.2.3.4.1455.67.89.5
Notice = “The Pwoks.local Certification Authority is internal only.”
URL = http://pki.pwoks.local/cps.html
[Certsrv_Server]
RenewalKeyLength = 4096
RenewalValidityPeriod = Years
RenewalValidityPeriodUnits = 5
AlternateSignatureAlgorithm = 0
LoadDefaultTemplates = 1

Install AD CS Role:
Ensure you are logged in to the Subordinate CA as a Domain Administrator to avoid any issues during installation and configuration.
Open Server Manager and add the Active Directory Certificate Services role.

Confirm the pop-up window, then select Certification Authority and Certification Authority Web Enrollment.

On the Web Server screen, confirm everything and click Next.

Configure Subordinate CA:
In Server Manager, select Configure Active Directory Certificate Services on the destination server. Use Domain Administrator and select Certification Authority and Certification Authority Web Enrollment.

Choose the following settings:
- Certificate Authority Setup Type: Enterprise CA
- Certificate Authority Type: Subordinate CA
- Cryptographic Provider: RSA#Microsoft Software Key Storage Provider
- Key Length: 4096 Bits
- Signature Hash Algorithm: SHA256
- CA Common Name: pwoks-SubCA-CA
- Validity Period: 5 years
Save certificate request file to Subordinate Server
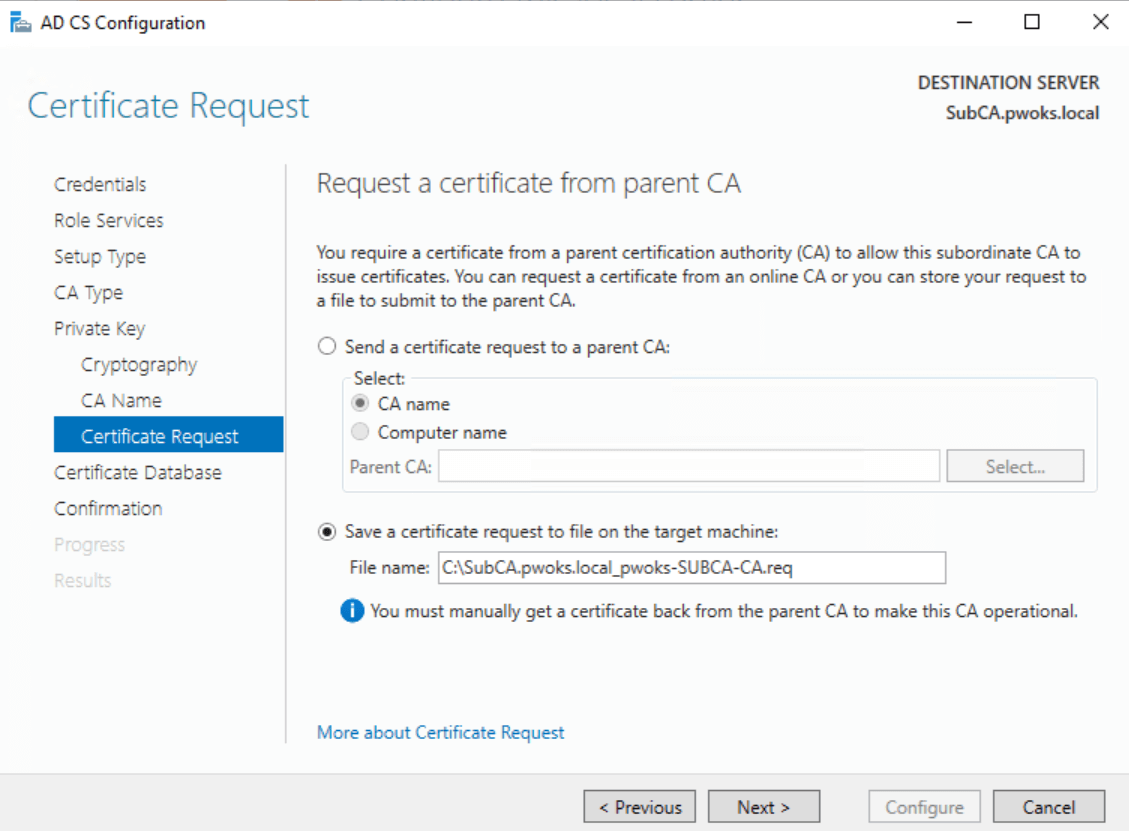

The expected result is that we need to send the generated .req file to the Root CA to issue a certificate.
Issue Subordinate Certificate:
Start certsrv.msc on the Subordinate CA to validate the setup. The service will be stopped until we get the certificate from the Root CA.

On the Subordinate CA (SubCA), create a folder named C:\CertData. Copy the .crl and .crt files created on the Root CA into this folder. The .req file should also be in the root of the C: drive.


Transfer the .req file from the Subordinate CA to the Root CA. Since keeping the Root CA on the network isn’t advisable use a USB drive

Creating the CertData Virtual Directory on SubCA
Open IIS Manager. Expand Sites, right-click on Default Web Site, and select Add Virtual Directory.

Enter CertData as the alias and C:\CertData as the physical path. Confirm with OK. Select the newly created virtual directory, click on Directory Browsing, and enable it.

Restart IIS to apply the changes. And now we need to validate the setup. From a client machine, access http://pki.test.local/CertData/ in a browser to ensure everything is set up correctly.

Enable Double Escaping in IIS
In IIS on the Subordinate CA, go to Default Website. Select Request Filtering from the middle window, then Edit Feature Settings. Enable Allow double escaping and confirm with OK.

Creating the Subordinate Certificate
On the Root CA, open the Certification Authority console (certsrv.msc). Right-click on Root CA, select All Tasks, and then Submit new request.
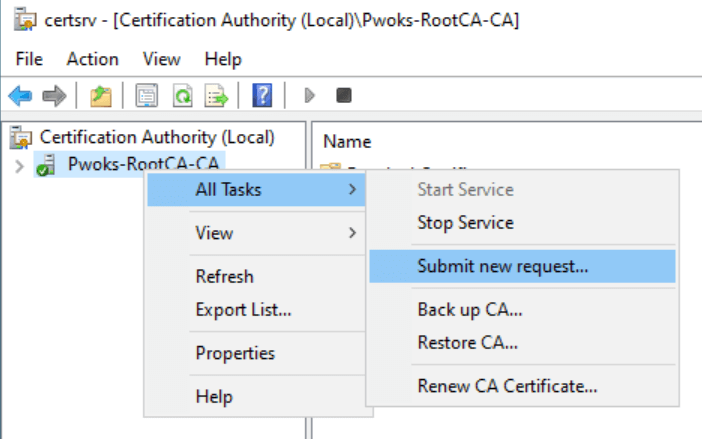
Browse to C:\RootCA and select the .req file from the Subordinate CA

Issue the Certificate:
On the Root CA, right-click on the request ID (e.g., request ID 2) and select All Tasks > Issue.

The certificate will now appear in the Issued Certificates section.

Double-click the certificate to verify its details, such as a validity period of 5 years and specifications like RSA 4096 and SHA256.

Export the Certificate:
While viewing the certificate details, go to the Details tab and click on Copy to File….

This will start the Certificate Export Wizard. Click Next. Select the .P7B format and check the option to Include all certificates in the certification path if possible.

Save the file as SubordinateCA.p7b in the C:\RootCA folder.
Transfer the Certificate:
Transfer the SubordinateCA.p7b file from the Root CA to the Subordinate CA (SubCA) using a USB drive or network, depending on your company’s security policies. Copy the file to the C:\ directory on SubCA.

Install the CA Certificate on Subordinate CA:
On the Subordinate CA (SubCA), open the Certification Authority console (certsrv.msc). Right-click on your server, select All Tasks > Install CA Certificate….

If you encounter the error “Cannot verify certificate chain. Do you wish to ignore the error and continue? The revocation function was unable to check revocation because the revocation server was offline 0x80092013”, confirm with OK

Now Start Service

oppps… Another error

To fix this issue open a command prompt as an administrator on the Subordinate CA. Run the following command to ignore offline revocation checks:

Attempt to start the Certification Authority service again

By following these steps, you should be able to successfully issue and install the Subordinate CA certificate, even if the Root CA is offline during the process
Set Maximum Certificate Age
To ensure that certificates issued by SubCA are valid for only one year, open PowerShell as an administrator and enter the following command:
certutil.exe -setreg CA\ValidityPeriod “Years”
net stop CertSvc
net start CertSvc

While you’re at it, you can set a few other configurations:
Certutil -setreg CA\CRLPeriod “Weeks”
Certutil -setreg CA\CRLDeltaPeriodUnits 1
Certutil -setreg CA\CRLDeltaPeriod “Days”
Certutil -setreg CA\CRLOverlapPeriodUnits 12
Certutil -setreg CA\CRLOverlapPeriod “Hours”
net stop CertSvc
net start CertSvc

Let’s back to IIS. Open IIS and select CertEnroll. From the main screen, select Directory Browsing and enable it.
Restart the IIS. Test the link: http://pki.pwoks.local/CertEnroll. If you can click on files and download them, it works. If not, check the double escaping configured earlier.
Enable Auditing
Enable audit object access in Local Security Policy for both failure and success. Open PowerShell as an administrator and type:
net stop CertSvc
net start CertSvc
Subordinate CA CDP and AIA Configuration
Repeat the CDP and AIA configuration on the Subordinate CA. Run Command Prompt as an administrator and type the following in one line:
AIA Configuration:
CDP Configuration:
Check the values with:
certutil -getreg CA\CACertPublicationURLs

Restart the services:
net start CertSvc
Publish the configurations:

For AIA, ensure that “Include in AIA extension” is selected for the http link.
Certificate Practice Statement Document
Create cps.html and copy the following code into it. Then, copy cps.html to c:\inetpub\wwwroot:
<!DOCTYPE html>
<html>
<head>
<meta charset=”utf-8″>
<title>Pwoks Domain Certification Practice Statement</title>
</head>
<body>
<h1>Pwoks Domain Certification Practice Statement</h1>
<p>The Pwoks Domain Certification Authority is internal only.</p>
<p>All issued certificates are for internal usage only.</p>
<p>Unauthorized usage strictly forbidden.</p>
</body>
</html>
You can edit it according to your needs.

Firewall Rules
Ensure the firewall is on and enable the following rules:
Echo Request – ICMPv4-in (ICMP) so we can ping
World Wide Web Services HTTP Traffic-In TCP/80
World Wide Web Services HTTPS Traffic-In TCP/443
Add Root CA to Active Directory
Since the Root CA is offline, add it to Active Directory so it is recognized. Run PowerShell as an administrator and type:
-f “C:\CertData\RootCA_Pwoks-RootCA-CA.crt” RootCA
certutil.exe -addstore `
-f root “C:\CertData\RootCA_Pwoks-RootCA-CA.crt”
certutil.exe -addstore `
-f root “C:\CertData\Pwoks-RootCA-CA.crl”

If you encounter issues, open Command Prompt as an administrator, navigate to C:\CertData where you have the RootCA CRL and CRT files, and execute the following command:

Copy the ROOTCA CRL and CRT files from C:\CertData to C:\Windows\System32\certsrv\CertEnroll.

Active Directory Configuration
On your Domain Controller, open Active Directory Sites and Services. Select View and enable Show Services Node.

Open Public Key Services and click on AIA. You should see both SubCA and ROOTCA

Under CDP, you should have two subfolders named SubCA (Subordinate CA) and RootCA (Offline Root CA), each with distribution points inside.

Verifying PKI Infrastructure
On SubCA, run pkiview.msc. Ensure there are no red crosses or “unable to download” statuses for the offline Root CA and Subordinate CA.

If you encounter issues, ensure the rootca CRL and CRT files are in C:\Windows\System32\certsrv\CertEnroll and execute the extra dspublish command for the CRL in Command Prompt.
Congratulations! You now have a functional Two-Tier CA. Remember not to turn off the Root CA until the entire PKI implementation is complete.