
In the first and second parts, we deployed PKI, and in the third part, we made these certificates available on our domain via group policy. Now, we will configure the Online Responder Role, which is crucial for the revocation of certificates. This guide will show you how to do it properly.
We will perform this configuration on the SubCA server. To start, we need to add the Online Responder role to this server. Assuming you know how to navigate Server Manager and add a role, I won’t provide step-by-step screenshots. Simply go to Server Manager, select Manage, then Add Roles and Features. Under Server Roles, expand Active Directory Certificate Services and select Online Responder. Confirm any additional pop-ups and finish the process.

Enable Online Responder Role
In Server Manager, you will see a notification to configure Active Directory Certificate Services on the destination server. You can click on it to start the configuration. I will execute this through PowerShell, but if you prefer the GUI, you need to enter Domain Admin credentials on the first screen, select the Online Responder role on the second screen, and then confirm and close.
To enable the Online Responder Role via PowerShell, start PowerShell as an administrator and type in:
Install-AdcsOnlineResponder -Force
It will throw a blank error field without confirmation, but that means the Online Responder Role is enabled.

Next, we will validate the OCSP role in IIS.

If the OCSP folder is not visible, you can run a following command in elevated PowerShell
certutil.exe -vocsproot
and then reset IIS.
Add OCSP URL to SubCA (Subordinate CA)
We will continue our setup on the SubCA server. In the search bar, enter certsrv.msc to start the Certificate Authority console. Right-click on your Certificate Authority server (in this case, pwoks-SUBCA-CA) and select Properties. Navigate to the Extensions tab and select Authority Information Access under Extensions.
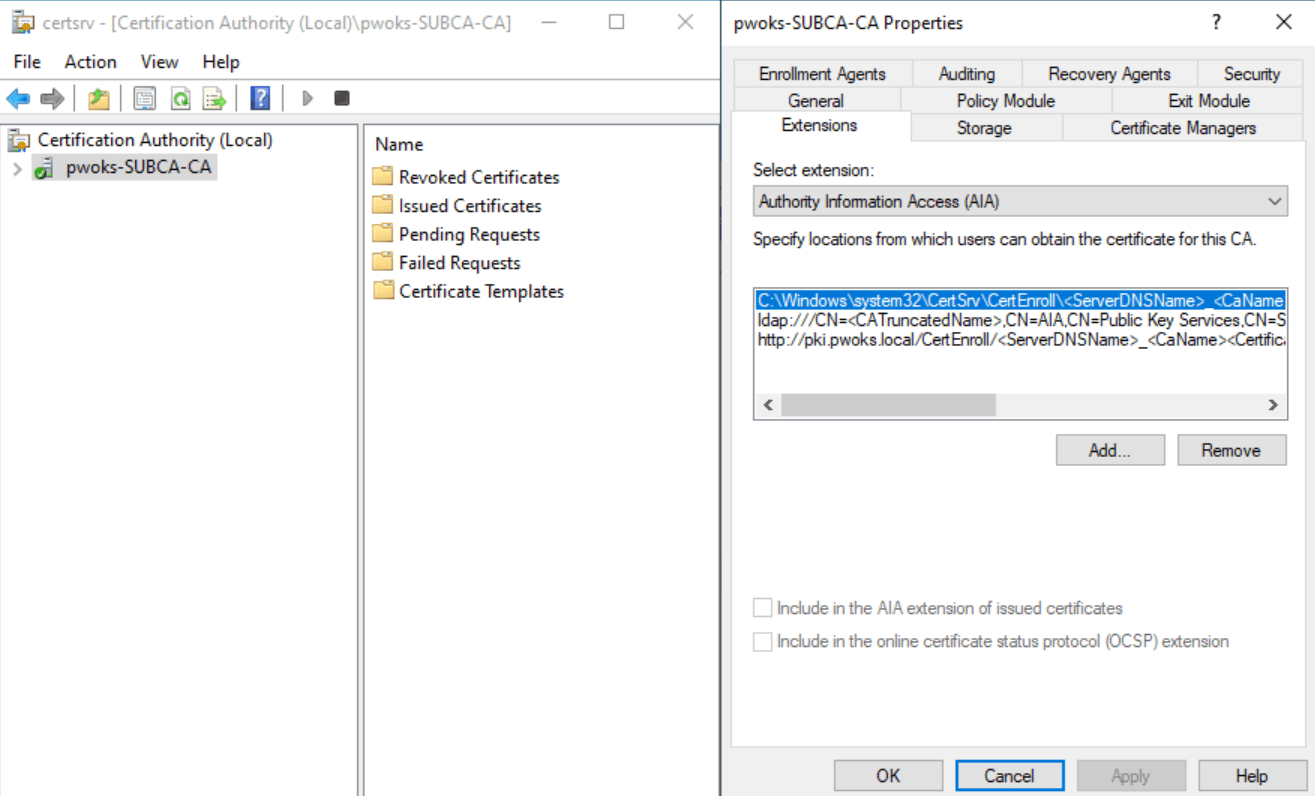
Click on Add and enter the location http://ocsp.pwoks.local/ocsp, then press OK.

Ensure that “Include in the online certificate status protocol (OCSP) extension” is selected. Confirm with Apply, then OK. You will need to restart AD Certification Services, so press Yes.

Configure and Publish the OCSP Response Signing Certificate
On SubCA, open the Certificate Authority console (certsrv.msc). Expand your server, right-click on Certificate Templates, and select Manage. Find and right-click on OCSP Response Signing, then select Duplicate Template.

A new window will pop up, positioned in the Compatibility tab. Under Certification Authority, select Windows Server 2016, and under Certificate recipient, select Windows 10/Windows Server 2016. Confirm any pop-ups with OK and stay in this window.

In the General tab, change the display name and leave everything else as is.

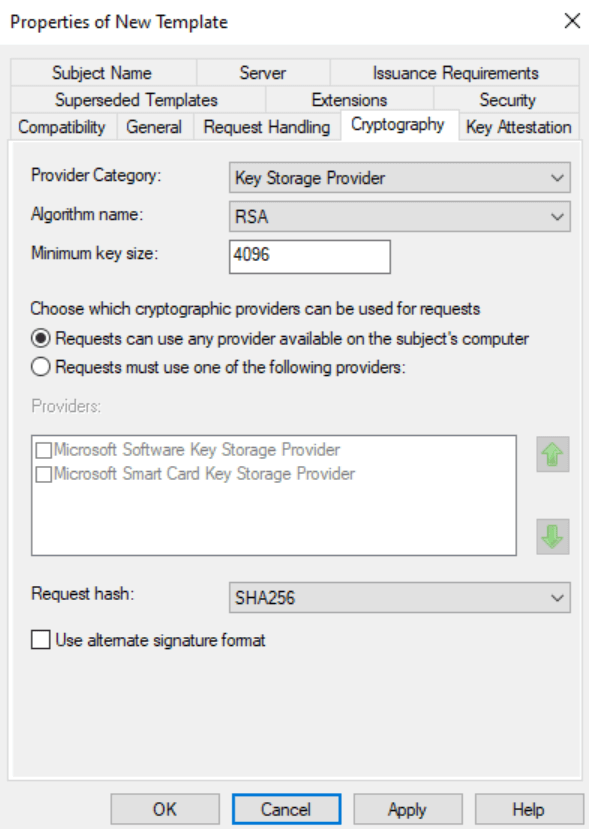
In the Cyrptography tab, change the Minimum key size to 4096 and the Request hash to SHA256.
In the Security tab, select Authenticated Users and enable the Enroll permission.

Also, add your SubCA server and enable Read and Enroll Permissions.

Click Apply, then OK to close the window. The template is now added and listed. Close the Certificate Templates console but stay in the Certificate Authority console.
Right-click on Certificate Templates again and select New.

Choose the template you created, OCSP Pwoks Local, and press OK.

The template is now listed in Certificate Templates.
Revocation Configuration
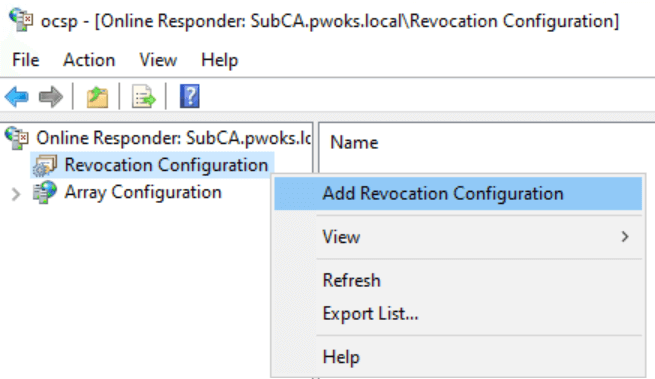
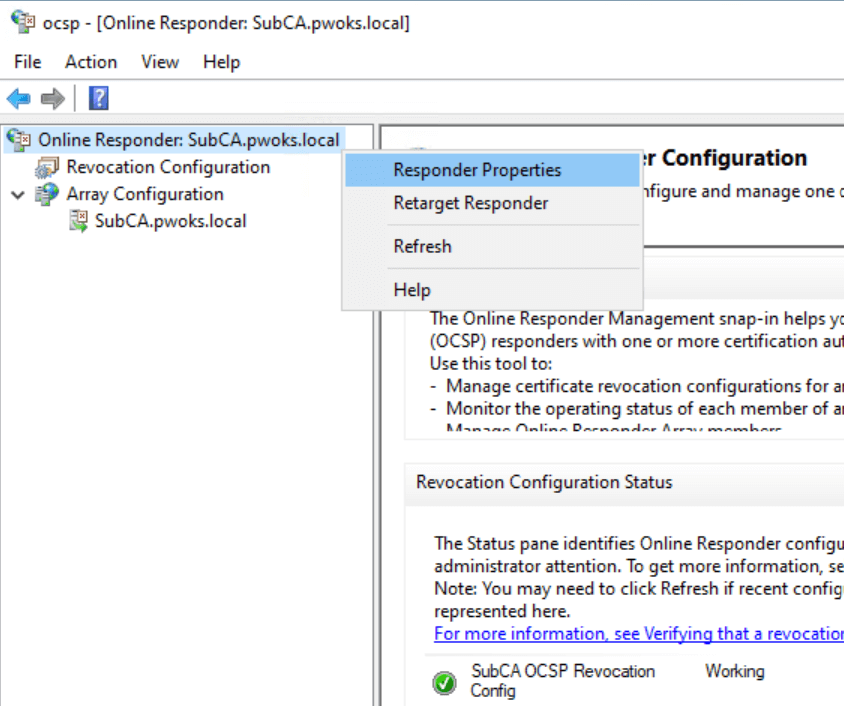
To configure revocation on the SubCA server, start by opening the Online Responder Management console. You can do this by typing ocsp.msc into the search bar on the SubCA server. Once the console is open, right-click on “Revocation Configuration” and select “Add Revocation Configuration.”
On the initial screen, you will see a series of steps. Click “Next” to proceed. Name the configuration as you prefer and click “Next” again. Choose a certificate for an existing Enterprise CA
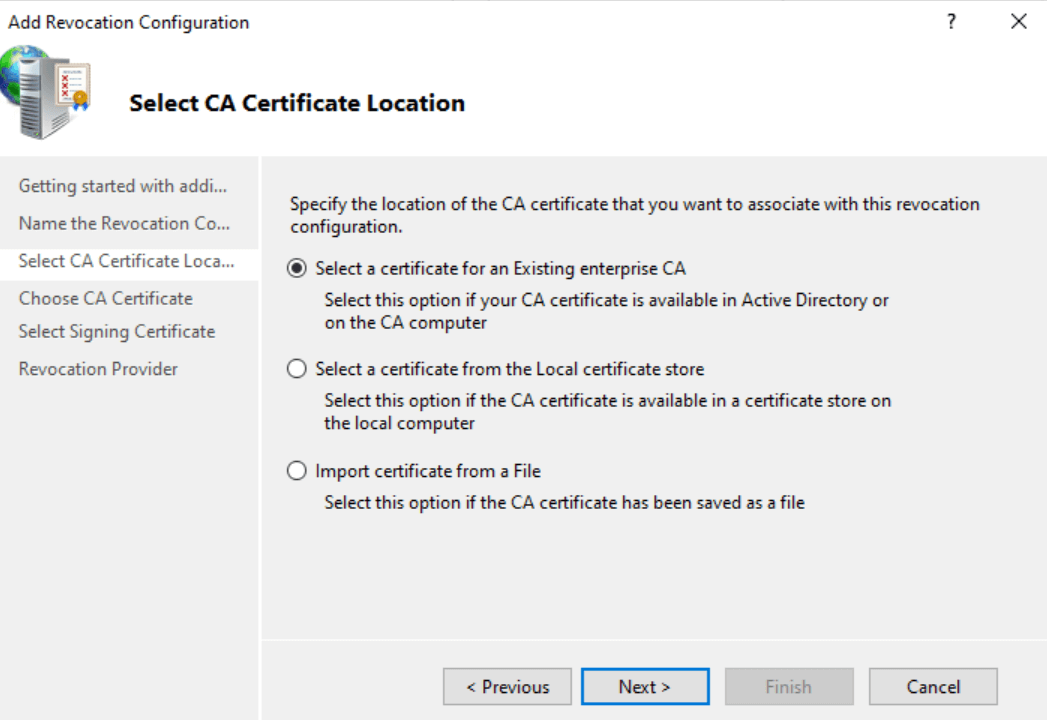
and browse the CA certificates published in Active Directory.

You should be presented with a certificate; click “OK” and then “Next.”

Use the default options and click “Next.” On the following screen, click the “Provider” button. For both LDAP and HTTP values, uncheck “Refresh CRLs based on their validity periods” and set the “Update CRLs at this refresh interval (min)” to 15 minutes. Click “OK” to confirm.

Finish adding the revocation configuration. If you expand “Array Configuration” and select “SubCA.pwoks.local,” the signing certificate should be correctly configured and operational. However, do not close the OCSP Management Console just yet.

Enable Auditing on the Online Responder
Next, enable auditing on the Online Responder. Right-click on “Online Responder” at the top of the window and select “Responder Properties.”
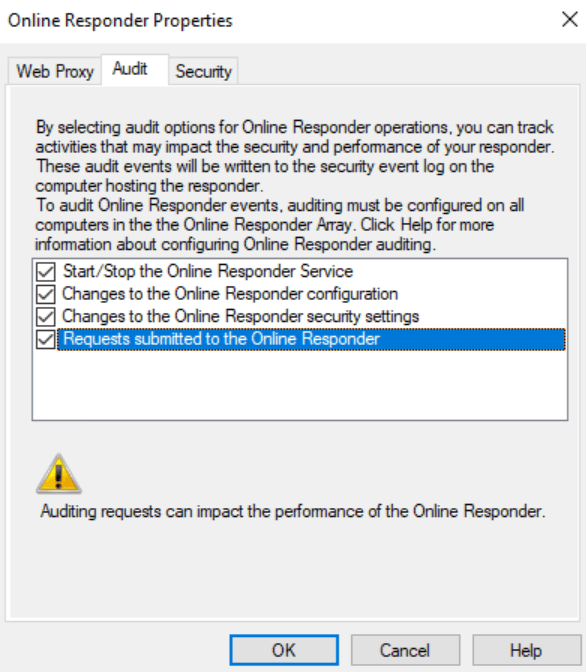
In the “Audit” tab, select all fields and click “OK.”
All events will now appear in the Event Viewer under “Security,” and you should look for Event IDs between 5120 and 5127.
Restart the Active Directory Certificate Services for these changes to take effect.
Add OCSP URL to Group Policy
To add the OCSP URL to Group Policy, go to the domain controller (DC) and open gpmc.msc. Select the “PKICerts” policy created in part 3 and click “Edit.”
Navigate to “Computer Settings | Policies | Windows Settings | Security Settings | Public Key Policies | Intermediate Certification Authorities.” Right-click on the SubCA certificate and select “Properties.”
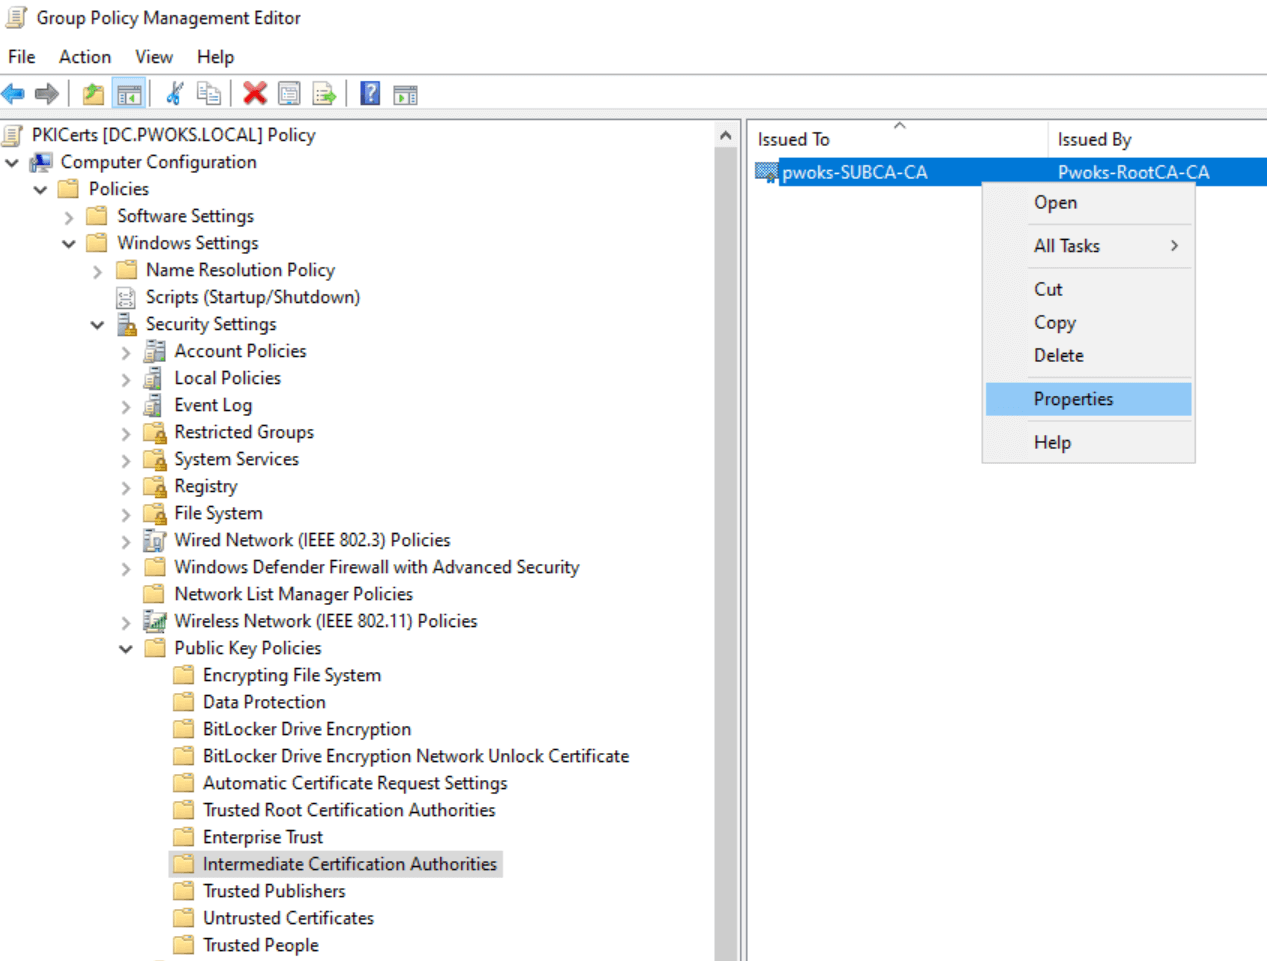
In the “OCSP” tab, enter the URL http://ocsp.pwoks.local/ocsp in the field next to “Add URL” and click “Add URL,” then “Apply” and “OK.”

With the Group Policy configured, close all windows and restart the Active Directory Certificate Services on SubCA. Note that deploying this URL through the domain can take up to one hour.
Verify OCSP Status
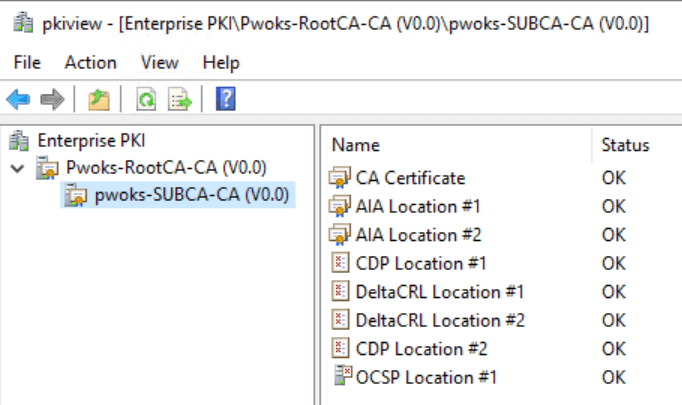
To verify the OCSP status, start by opening the Enterprise PKI console (pkiview.msc). Expand your node and server to check if the Online Responder is working correctly. If you see a red X on the OCSP, it indicates an issue.

Next, open the Certification Authority console (certsrv.msc) on the SubCA server. Navigate to the Issued Certificates folder and look for the certificate named CA Exchange. If you have more than one, right-click on each, select All Tasks, then Revoke Certificate, and confirm the action under Reason code.

Open PowerShell as an administrator and run the commands:
certutil.exe -cainfo xchg

After this, return to the Enterprise PKI console (pkiview.msc) to check if the red X has disappeared.
If everything is fine, the problem was likely with the CA Exchange certificate, which needed to be recreated because it was generated before the Online Responder was configured.
Test OCSP Connectivity
To test if the Online Responder works and can communicate through the domain, export and analyze the certificate using the URL Retrieval Tool. Start on the SubCA server and export the SubCA certificate to C:, naming it C:\SubCAcert.cer, without the private key.
Open PowerShell with elevated privileges on SubCA and run the following command, adjusting the location and name of the certificate as needed.
certutil.exe -URL “C:\SubCAcert.cer”
The URL Retrieval Tool will open.

Load the certificate, select Certs (from AIA) in the Retrieve field, and press Retrieve. The locations should appear, and the status should be Verified.
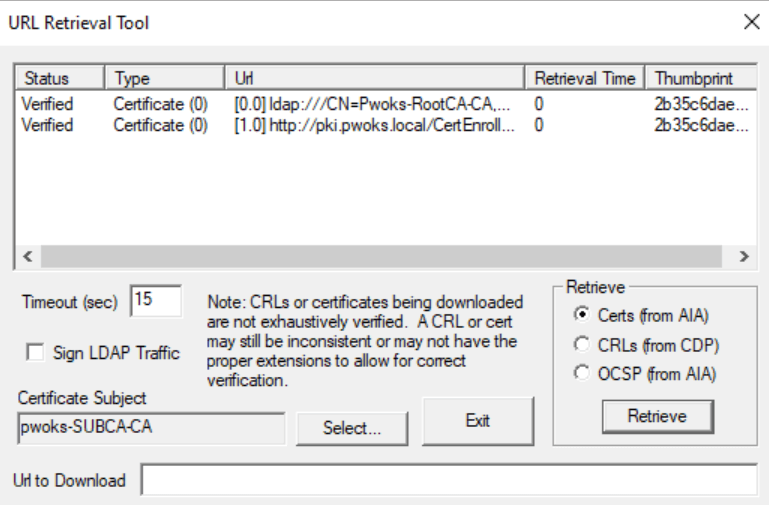
Repeat the process for CRLs (from CDP) and OCSP (from AIA). You should get links, and all should be verified.

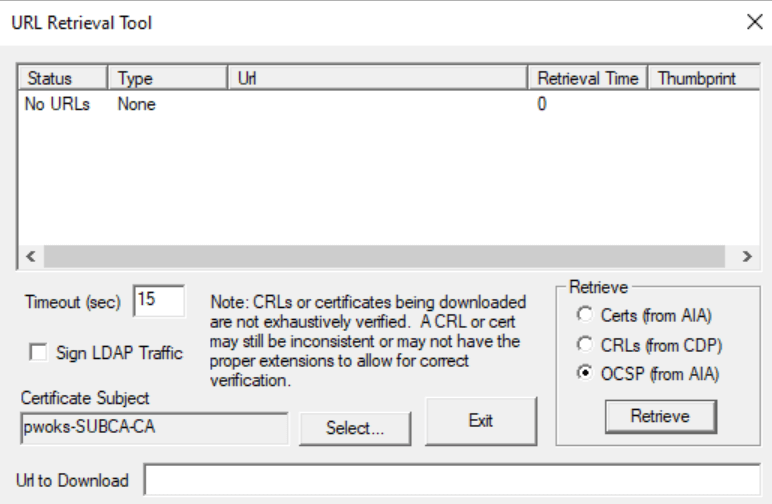
If everything is okay for CDP but you get no URLs for OCSP (from AIA), don’t be immediately concerned. Other tests might be fine, and no errors may show in the OCSP or PKI Manager console. Sometimes, it takes a while for AD propagation. If you still don’t have URLs after a few days, although everything seems to work fine, it might be worth investigating further.
Maintenance and Troubleshooting
OCSP requires regular maintenance and can sometimes cause issues. It’s important to periodically check the OCSP role to ensure it is functioning correctly. Be aware that after a reboot, ocsp.msc and pkiview.msc might show OCSP errors and red Xes. Patience is key, as it may take some time for services to start and become fully aware of the domain and services.