
In today’s digital landscape, certificates have become essential for almost everything. With the rise of web-based applications, the need for certificates has grown significantly. However, web browsers are becoming stricter, making it harder to rely on self-signed certificates. Additionally, certificates from public certificate authorities aren’t suitable for local domains. So, what’s the solution? We need to set up our own Public Key Infrastructure (PKI). I’ll guide you through the process in a series of articles…
Intro
If you’re determined to implement your own PKI infrastructure, please note that this blog should not be your sole resource. PKI infrastructure is a complex and critical topic, and making mistakes can cause irreversible damage to your domain environment. Therefore, consider this series of articles as a guide for your testing lab only. Use additional resources to deepen your understanding, as we will only cover the basics here. If you’re unsure about any aspect of PKI, consult experts in the field to help you build your infrastructure.
Public Key Infrastructure (PKI) is a framework of roles and policies designed to create and manage certificates.
Here are some common uses of PKI:
- Replacing self-signed certificates for internal network resources
- Issuing certificates for internal services and applications
- Encrypting files and systems
- Securing email communications
- Enhancing RDP security
What do PKI and CA stand for?
- PKI (Public Key Infrastructure): A solution for providing certificates.
- CA (Certificate Authority): A component that offers certificate services.
Why do you need your own PKI?
As mentioned earlier, commercial Certificate Authorities (CAs) won’t issue certificates for internal domains within non-routable internal networks.
So, why am I writing about this now? I’ve observed many environments struggling with self-signed certificates, leading to numerous issues with internal services. In today’s modern setups, especially with internal web-based applications, it’s becoming increasingly difficult to make things work due to the strict certificate requirements imposed by web browsers.
What do we need?
We need the Active Directory Certificate Services (AD CS) role. This will enable us to create a Public Key Infrastructure (PKI) and Certificate Authority (CA) in a Windows environment. This setup can be used with or without Active Directory (AD).
AD CS is versatile and can be used for SSL, digital signatures, VPN access, Mobile Device Management (MDM), secure LDAP (LDAPs), smartcards, and more.
I won’t dive into more details about AD CS here, as this is meant to be a concise guide.
Options for Deploying a Certificate Authority (CA)
As mentioned, a certificate authority can be set up in a domain or workgroup, and it can be either online or offline. Offline deployment is generally considered a better security practice.
There are three main types of CA deployments: One-Tier, Two-Tier, and Three-Tier.
One-Tier CA
This setup has a single root and issuing CA that handles all certificate issuance. It’s best suited for testing environments because it poses significant security risks, such as being a single point of failure or a bottleneck in large networks.
Two-Tier CA
This configuration includes an offline Root CA and an online Subordinate CA. The Subordinate CA issues certificates and can be revoked and replaced if compromised. This setup can be scaled up as needed. The Root CA should be brought online periodically (every 50 weeks is recommended) to update CDP and AIA records and ensure everything is functioning correctly. This is also a best practice recommended by Microsoft.
Three-Tier CA
This is the most complex setup, featuring an offline Root CA, an Intermediate CA (sometimes offline), and an online Subordinate Issuing CA. This configuration offers the most flexibility and is typically used in large organizations.
For this guide, we’ll focus on the Two-Tier CA setup. The Three-Tier CA is quite complex and often requires a dedicated team for support.
Key Terms Explained:
- Root CA: The top-level CA. In a One-Tier setup, it handles everything.
- Intermediate and Subordinate CA: In Microsoft’s terminology, these are the same. In a Three-Tier setup, the Intermediate CA sits between the Root and Subordinate CA. The Subordinate CA handles certificate issuance in a Two-Tier setup.
- CRL (Certificate Revocation List): A list of revoked certificates that are no longer valid.
- AIA (Authority Information Access): Provides URLs for certificate revocation.
- CDP (CRL Distribution Points): Provides URLs or locations where clients can retrieve the CRL to check if a certificate is valid.
Certificate Types:
We’ll be using the X.509 certificate standard. Common formats in Windows environments include:
- .cer
- .p7b
- .pfx
- .sst
You can also manipulate extensions and use .crt, or convert .pfx to .key and .crt/.pem. For a short guide on converting .pfx certificates, you can check out this link.
When exporting certificates, always use very strong passwords—preferably stronger than 16 characters.
Private Enterprise Number (PEN)
If you’re planning to use your Certificate Authority (CA) only internally, you don’t necessarily need a Private Enterprise Number (PEN). However, having a PEN can be beneficial, and the process to obtain one is quick and free through the Internet Assigned Numbers Authority (IANA) website. I’ve done this a few times, and it usually takes anywhere from a few hours to a few days to get a number—it’s quite straightforward.
You can request your PEN here: IANA PEN Application.
When deploying, you’ll need to define an Object Identifier (OID) number in your files. This can be a generic Microsoft OID (1.2.3.4.1455.67.89.5) or your unique PEN number. Since obtaining a PEN is easy, I recommend getting one before moving to production. For testing, we’ll use the Microsoft-provided OID.
This is a very brief overview—make sure to do thorough research before implementing this in a production environment.
Prerequisites / Lab Configuration
Before deploying PKI in production, ensure there isn’t already a Root CA in your domain. You can find out how to check this here.
We’ll use four machines to start. I won’t cover the details of setting up VMs, networking, and domains, assuming you’re familiar with these steps. Here are the lab details:
Domain: pwoks.local
- All Machines:
- 2 CPUs
- 8GB of RAM (4GB minimum if RAM is limited)
- 60GB of disk space
- Operating Systems:
- Servers: Windows Server 2022 Standard (Datacenter Edition doesn’t offer extra features for CA)
- Client: Windows 11 Pro/Enterprise 23H2
- IP Range: 10.0.1.0/24 (Azure Internal Network)
Domain Controller:
- Name: DC.pwoks.local
- IP: 10.0.1.4
- OS: Windows Server 2022 Standard Desktop Edition
- Roles:
- DNS Server integrated into DC
- Domain Users OU: Winuser1
- Computers OU: Clients
- Servers OU: Servers
Root CA:
- Name: RootCA
- IP: 10.0.1.5
- Workgroup: Pwoks-CA
- Local Administrator: certadmin (Administrator account disabled)
- Folder: C:\RootCA
- CA Name: Pwoks-RootCA-CA
- OS: Windows Server 2022 Standard Desktop Edition
This machine will not be part of the domain, will be BitLocker protected, and turned off after configuration. It will not have an Ethernet connection to the rest of the network. No additional services or apps should be installed. When needed online, use a network only if necessary.
Subordinate CA:
- Name: SubCA.pwoks.local
- IP: 10.0.1.6
- CA Name: Pwoks-SubCA-CA
- Domain OU: Servers
- Login: Domain administrator account
- OS: Windows Server 2022 Standard Desktop Edition
BitLocker disk encryption is strongly recommended. This CA will issue certificates, manage CRLs, and be a domain member.
Client:
- Name: client.pwoks.local
- IP: 10.0.1.7
- OS: Windows 11 Enterprise
- Domain: Joined to pwoks.local
Certificate Prerequisites:
- Root CA Certificate: SHA256 with 4096 bits, valid for 10 years
- Subordinate Certificate: Valid for 5 years
- Issued Certificates: Valid for 1 year
You can adjust these validity periods, but keep in mind that security standards, especially for browsers, are becoming stricter. Certificates with long validity periods may not be trusted.
Internal Links:
At the end of deployment, links will point to SubCA.pwoks.local:
- Web Instance: http://subca.pwoks.local
- Root CA CRL: http://pki.pwoks.local/CertData/
- Enterprise CA CRL: http://pki.pwoks.local/CertEnroll/
- Active Directory Web Enrollment Service: https://pki.pwoks.local/CertSrv/
- Certificate Practice Statement: http://pki.pwoks.local/cps.html
Note the use of HTTP links. When a new device connects, it may not trust your internal root and subordinate certificates, so it will appear as untrusted. The exception is AD, which is used to submit certificate requests to the Enterprise CA.
Configuration
We’ll be handling all the steps through PowerShell since it’s much faster than using the GUI. Let’s start with preparing our PKI infrastructure by configuring the Root CA.
Root CA
First, we need to create a CAPolicy.inf file in the C:\Windows directory. This file will add configuration details to the CA during its creation.
Here’s an example of what my file looks like (mostly based on Microsoft’s documentation):
[Version]
Signature = “$Windows NT$”
[PolicyStatementExtension]
Policies = AllIssuancePolicy, InternalPolicy
Critical = FALSE
[AllIssuancePolicy]
OID = 2.5.29.32.0
[InternalPolicy]
OID = 1.2.3.4.1455.67.89.5
Notice = “The pwoks.local Certification Authority is an internal resource only.”
URL = http://pki.pwoks.local/cps.html
[Certsrv_Server]
RenewalKeyLength = 4096
RenewalValidityPeriod = Years
RenewalValidityPeriodUnits = 10
AlternateSignatureAlgorithm = 0
CRLPeriod = Years
CRLPeriodUnits = 10
CRLDeltaPeriod = Days
CRLDeltaPeriodUnits = 0
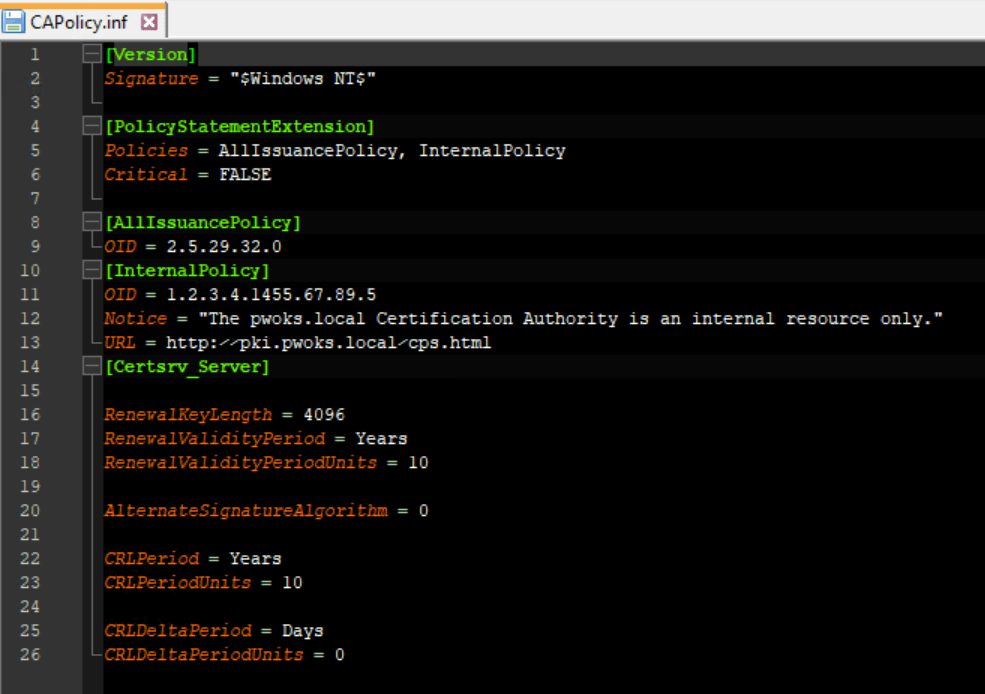
Copy to C:\Windows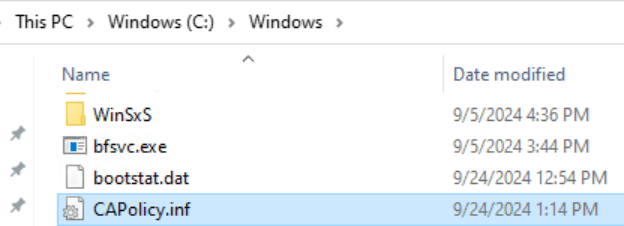
Make sure to replace pwoks.local with your actual data. If you have your PEN number, modify the OID line in the InternalPolicy section to OID=1.3.6.1.4.1.XX (where XX is your PEN number).
With the file above, we accomplished several things:
- Defined Renewal Info for Root CA: We set the renewal information for the Root CA.
- Disabled RSASSA-PSS Support: We turned off support for issuing certificates using the RSASSA-PSS algorithm (AlternateSignatureAlgorithm).
- Set CRL Lifetime: We made the CRL lifetime equal to the lifetime of the Root CA.
- Disabled Delta CRL: We disabled the option for Delta CRL since it won’t be needed in this configuration.
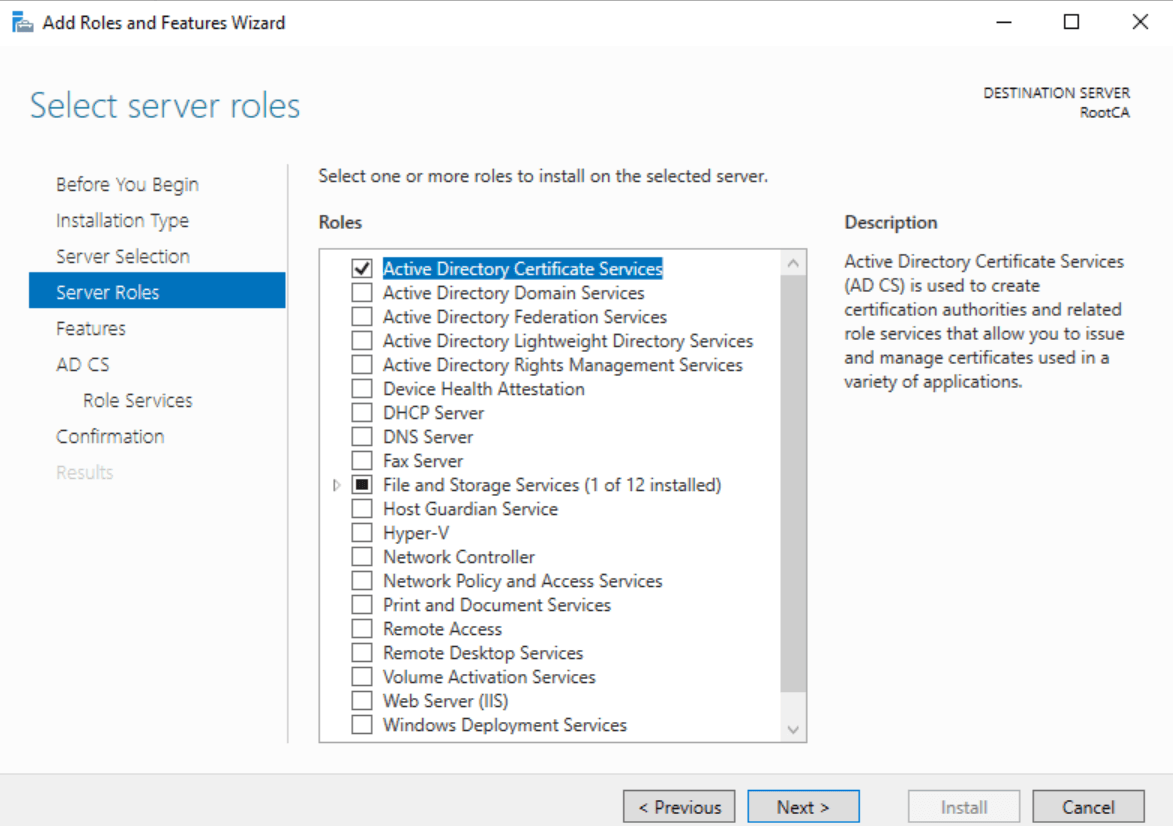
Installing the Root CA AD CS Role
Now that we’ve prepared the Root CA and placed the CAPolicy.inf file, we can proceed with installing the Active Directory Certification Services (AD CS) Role. Since you’re already familiar with the process, I won’t go through every screenshot in Server Manager.
Here’s what we’ll do:
- Open Server Manager: Go to Manage and select Add Roles and Features.
- Log in as certadmin: Make sure you’re logged in as the certadmin user (the local Administrator account is disabled) and that there’s no network connection on the Root CA machine.
- Select AD CS: Choose Active Directory Certificate Services from the list of roles.
This should get us started with the installation.
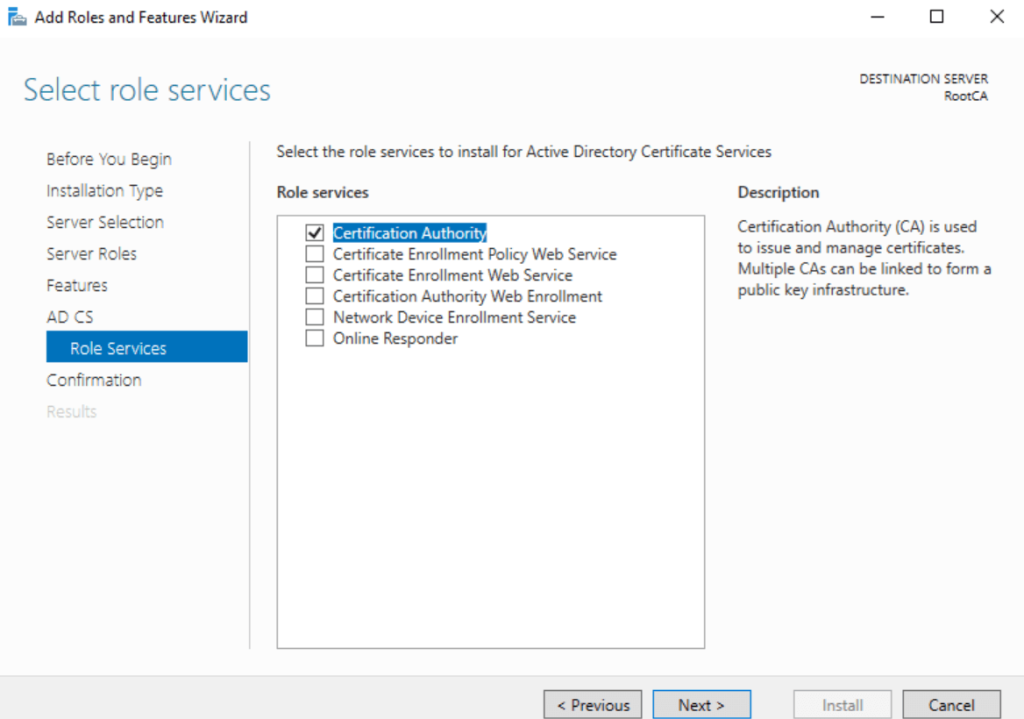
We’re going to walk through setting up a Root Certificate Authority (CA) with the following configuration details:
Certificate Authority Setup
- Setup Type: Standalone CA
- Authority Type: Root CA
- Cryptographic Provider: RSA#Microsoft Software Key Storage Provider
- Key Length: 4096 bits
- Signature Hash Algorithm: SHA256
- CA Common Name: Pwoks-RootCA-CA
In Server Manager, you should now see the option to “Configure Active Directory Certificate Services on the destination server.” Just a reminder—the network is offline, and we’re working with the certadmin account.
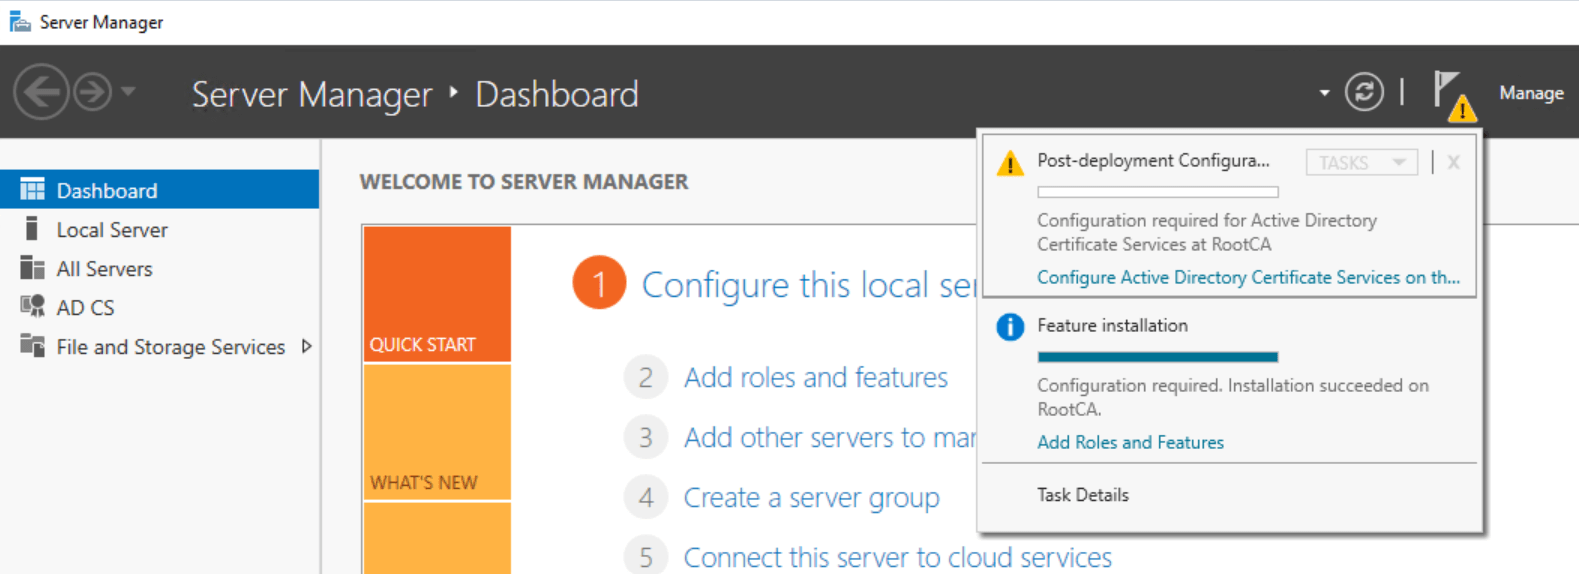
Configure AD CS
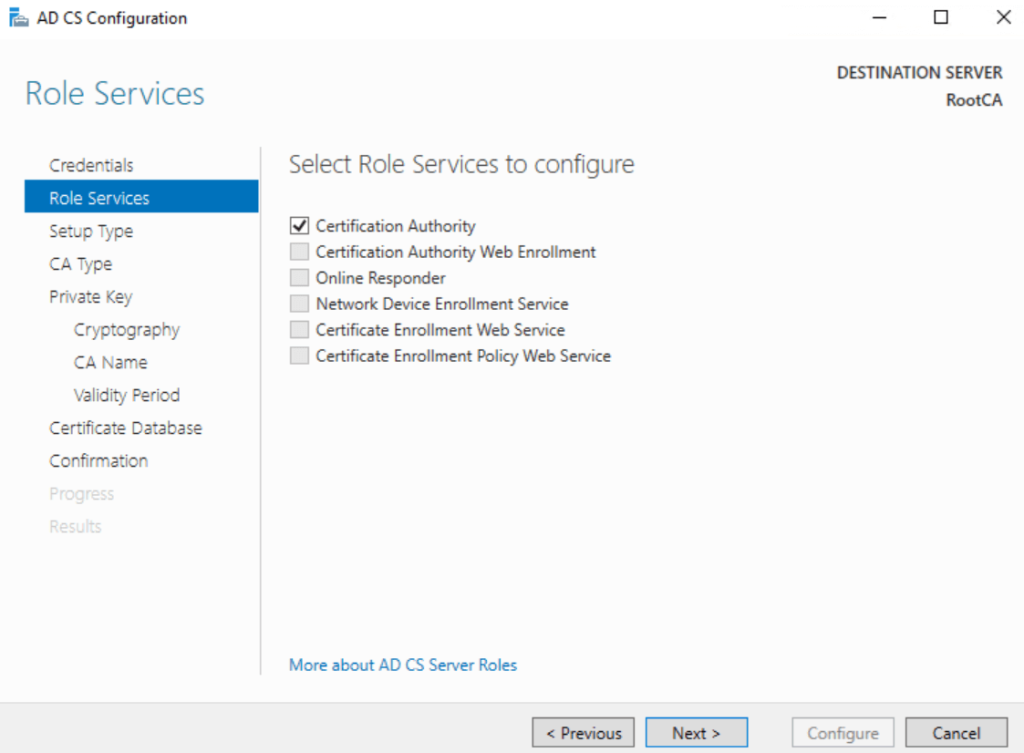
Certification Authority
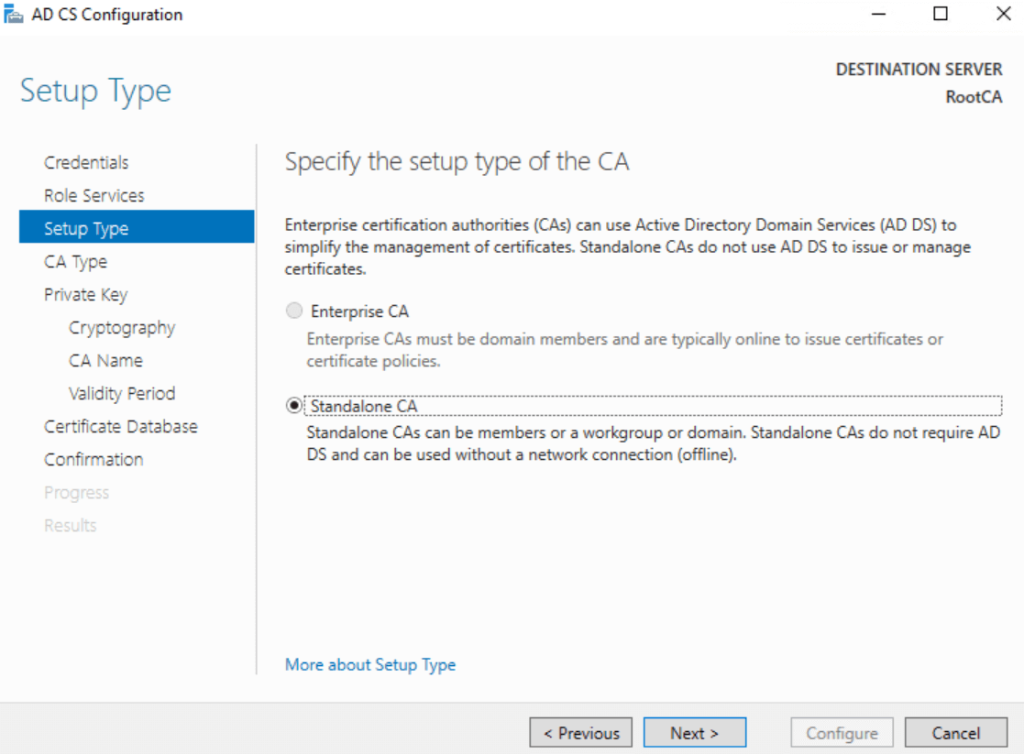
Standalone CA
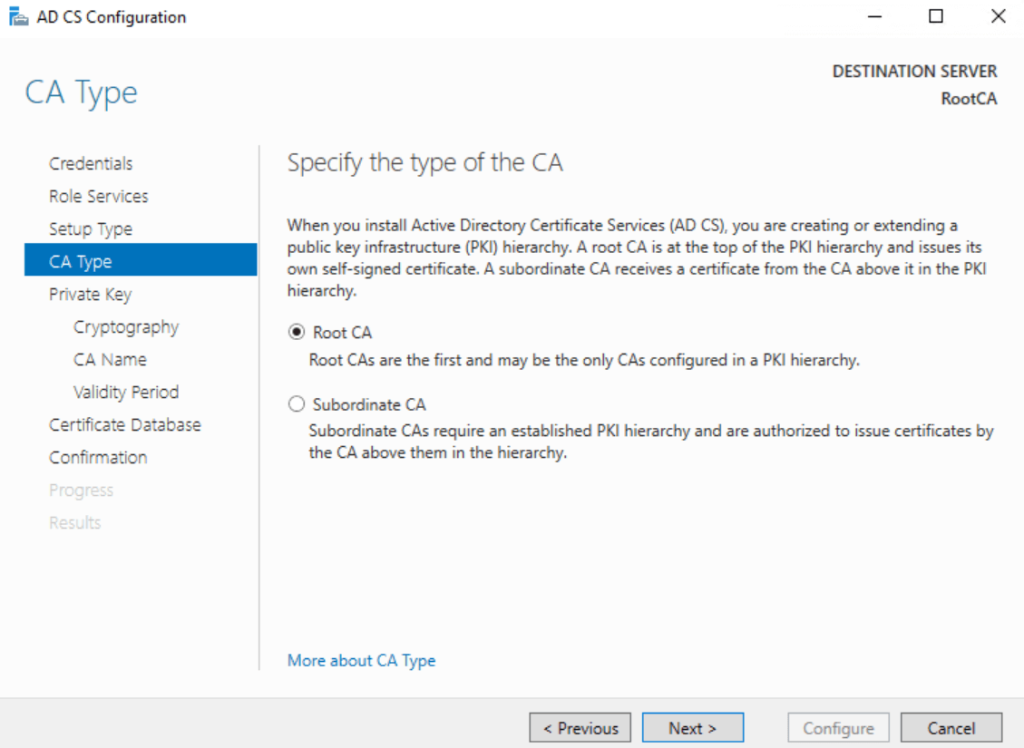
Root CA
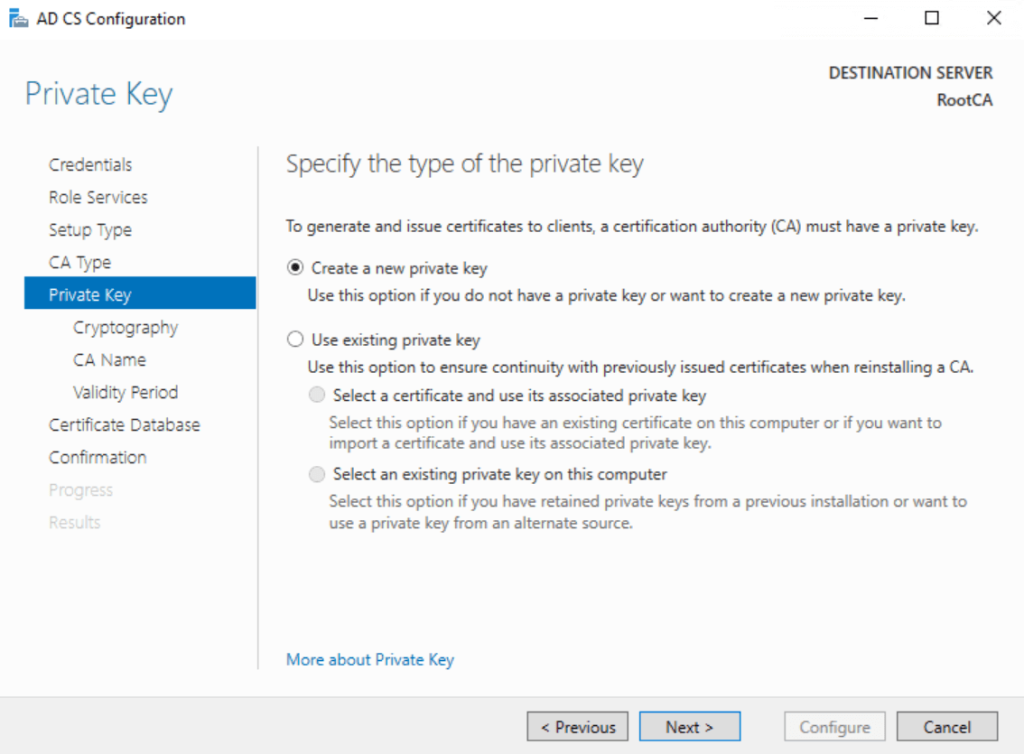
New Private Key
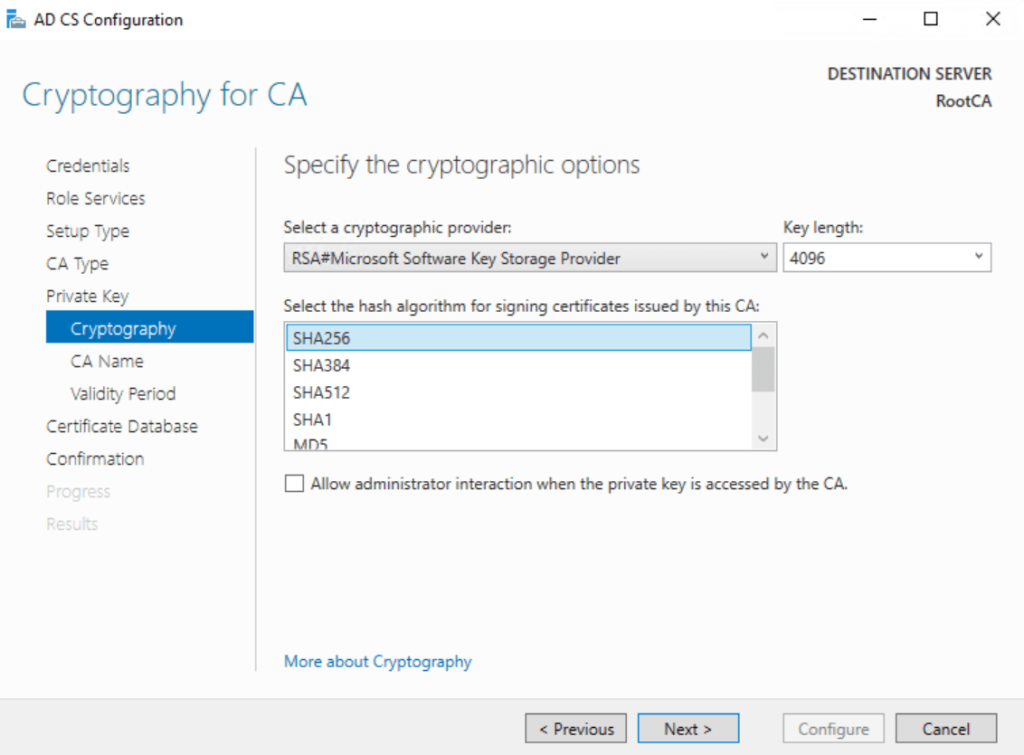
RSA#Microsoft Software Key Storage Provider , 4096 Key length and SHA256
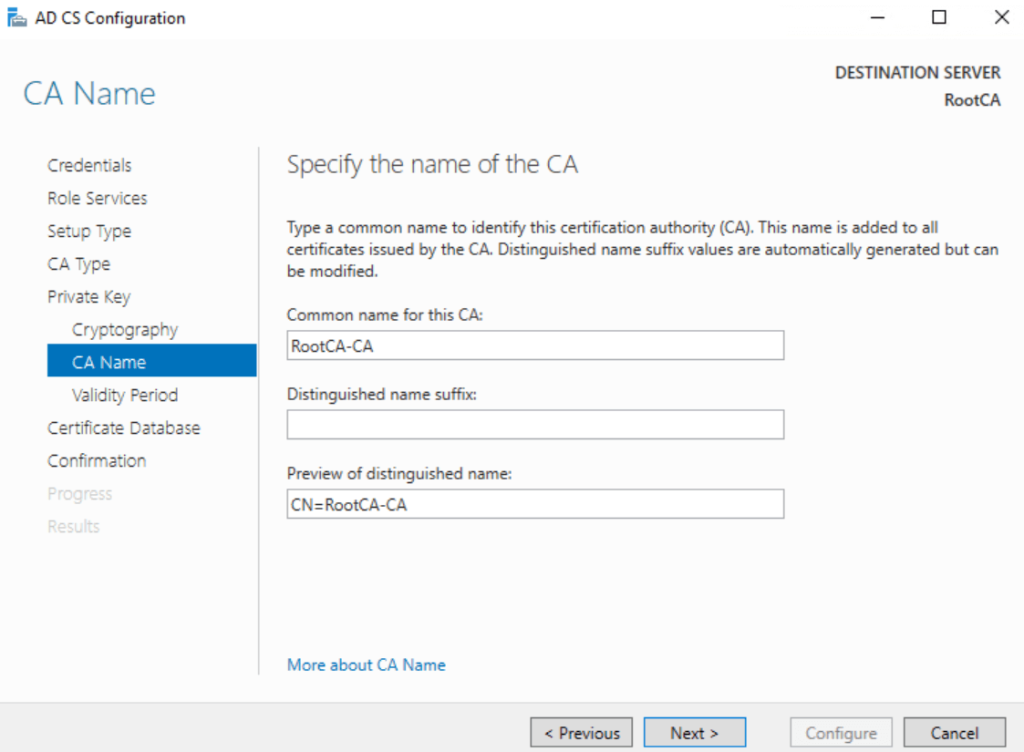
Leave default
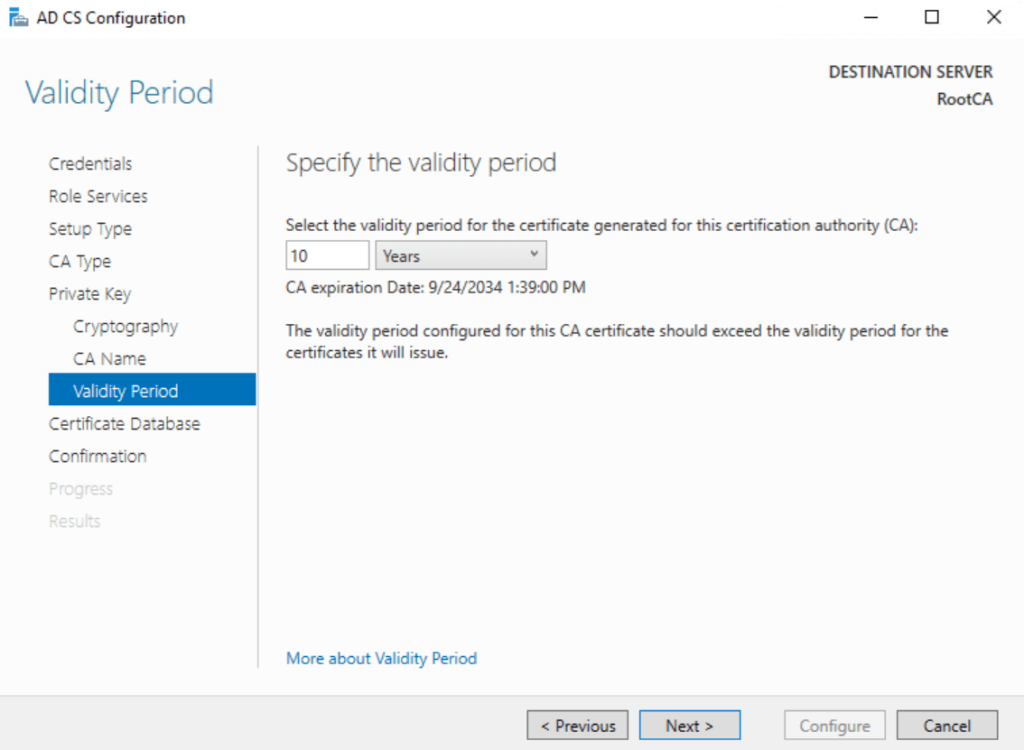
10 Years
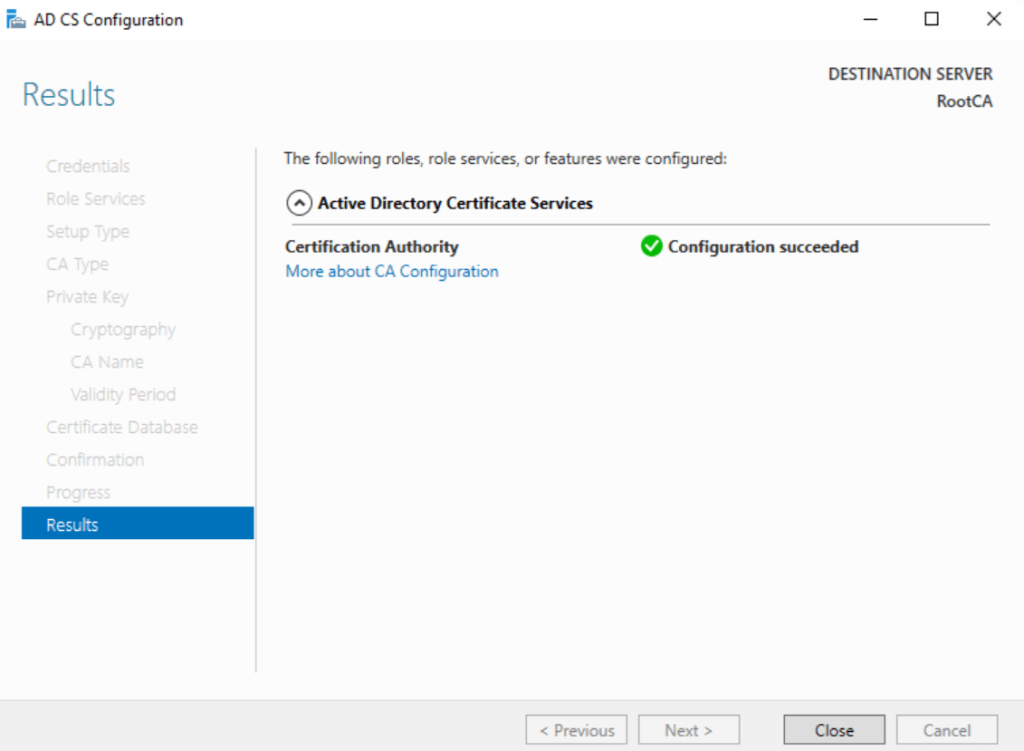
Configuration Succeeded
Root CA Validation
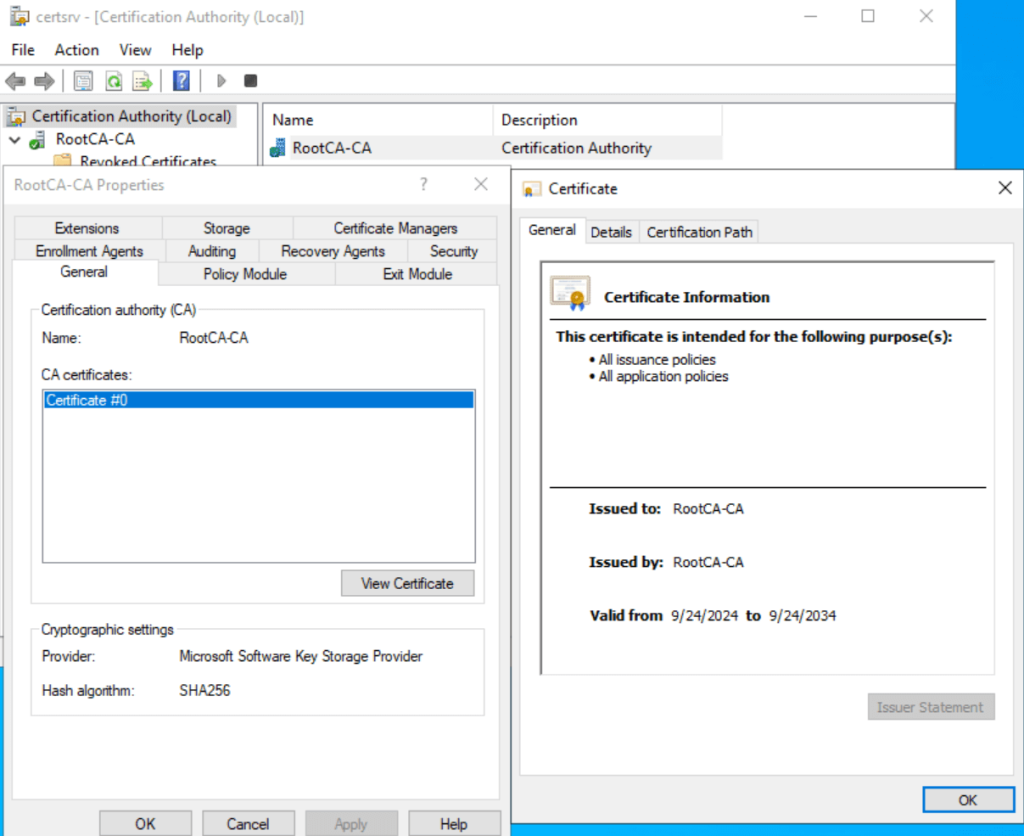
Once the Root CA is created, we need to verify that everything is functioning correctly. Open the Certification Authority console by typing certsrv.msc in the search bar. Under “Certification Authority,” you should see the newly created Test Domain Root CA. Right-click on it, select Properties, and on the General tab, click View Certificate. If the certificate appears, we’ve successfully created it, and it will be valid for 10 years.
Configuring the CRL on the Root CA
Next, we’ll make a few registry tweaks to ensure our Certificate Revocation List (CRL) is valid for 52 weeks. We’ll also extend the Subordinate CA’s validity from 1 year to 5 years.
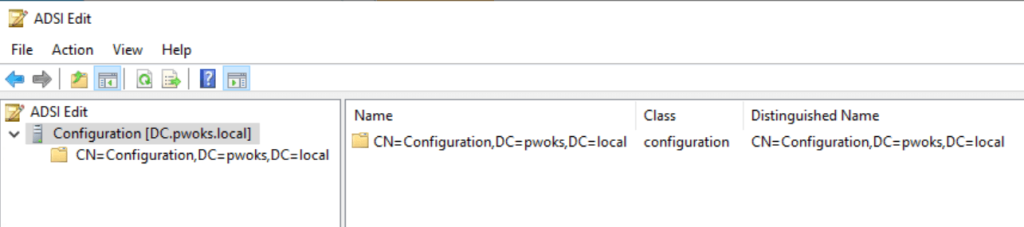
Additionally, we need to configure DCConfig so the Root CA knows the structure of the domain, even though it’s not a domain member. You can find all relevant settings in the registry under:
HKLM\SYSTEM\CurrentControlSet\Services\CertSvc\Configuration
To check the DSConfigDN values, you can use ADSIedit in Configuration view. Alternatively, you can go to Active Directory Users and Computers on your Domain Controller, enable Advanced Features, right-click on your domain (e.g., pwoks.local), select Properties, and find the distinguishedName field in the Attribute Editor. This will show the values needed for the DSConfigDN line.
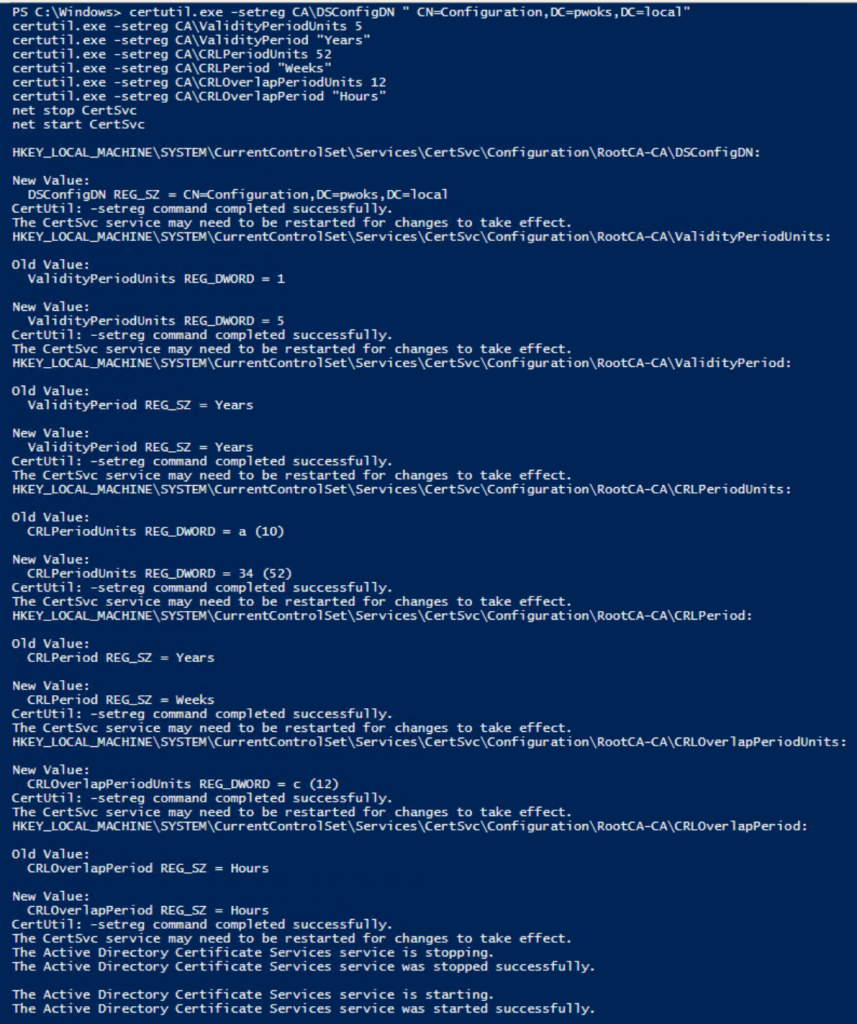
Now, we’ll run the following commands in PowerShell as an administrator using certutil.exe:
certutil.exe -setreg CA\DSConfigDN ” CN=Configuration,DC=pwoks,DC=local”
certutil.exe -setreg CA\ValidityPeriodUnits 5
certutil.exe -setreg CA\ValidityPeriod “Years”
certutil.exe -setreg CA\CRLPeriodUnits 52
certutil.exe -setreg CA\CRLPeriod “Weeks”
certutil.exe -setreg CA\CRLOverlapPeriodUnits 12
certutil.exe -setreg CA\CRLOverlapPeriod “Hours”
net stop CertSvc
net start CertSvc
Important: Remember to power up your Root CA every 52 weeks. Set a reminder at 50 weeks to ensure continuity.
Enabling Auditing on the Root CA
Although not mandatory, it’s a good idea to enable auditing for better visibility. Go to Local Security Policy > Local Policies > Audit Policy > Audit Object Access and enable both success and failure
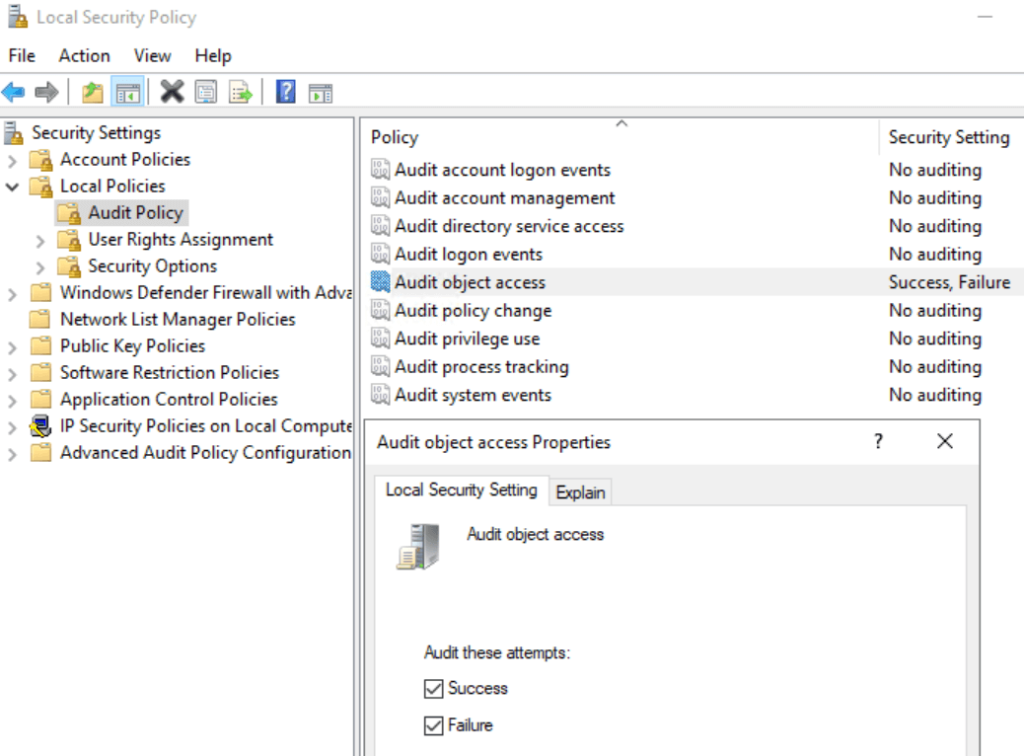
To enable auditing for all events on the Certificate Authority, run the following:
certutil.exe -setreg CA\AuditFilter 127
net stop CertSvc
net start CertSvc
You can verify this by opening certsrv.msc, right-clicking on your server, and checking the Auditing tab to ensure everything is selected.
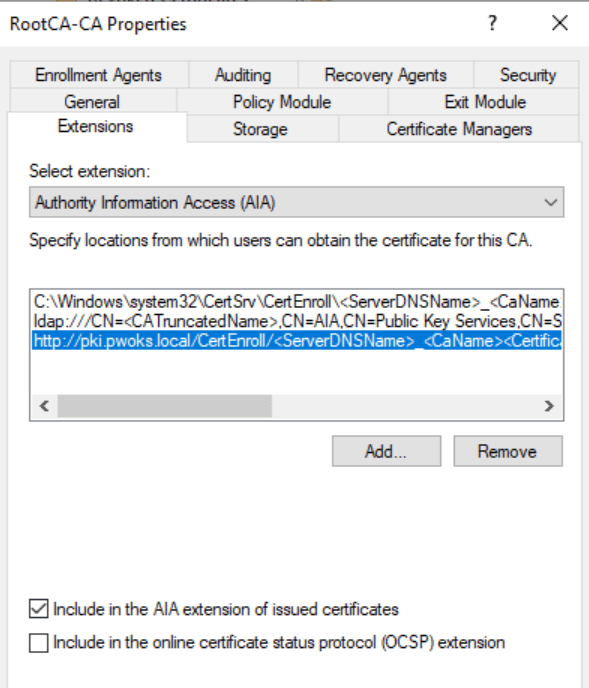
Configuring CDP and AIA on the Root CA
Next, we’ll configure the CRL Distribution Point (CDP) and Authority Information Access (AIA) for the Root CA. Since PowerShell sometimes loses characters, we’ll use the Command Prompt for these commands. First, copy them into Notepad or Visual Studio Code to ensure they are on one line.
Run the following commands in Command Prompt as an administrator:
For CDP:
certutil -setreg CA\CRLPublicationURLs “1:C:\Windows\system32\CertSrv\CertEnroll\%3%8%9.crl\n10:ldap:///CN=%7%8,CN=%2,CN=CDP,CN=Public Key Services,CN=Services,%6%10\n2:http://pki.pwoks.local/CertEnroll/%3%8%9.crl”
For AIA:
certutil -setreg CA\CACertPublicationURLs “1:C:\Windows\system32\CertSrv\CertEnroll\%1_%3%4.crt\n2:ldap:///CN=%7,CN=AIA,CN=Public Key Services,CN=Services,%6%11\n2:http://pki.pwoks.local/CertEnroll/%1_%3%4.crt”
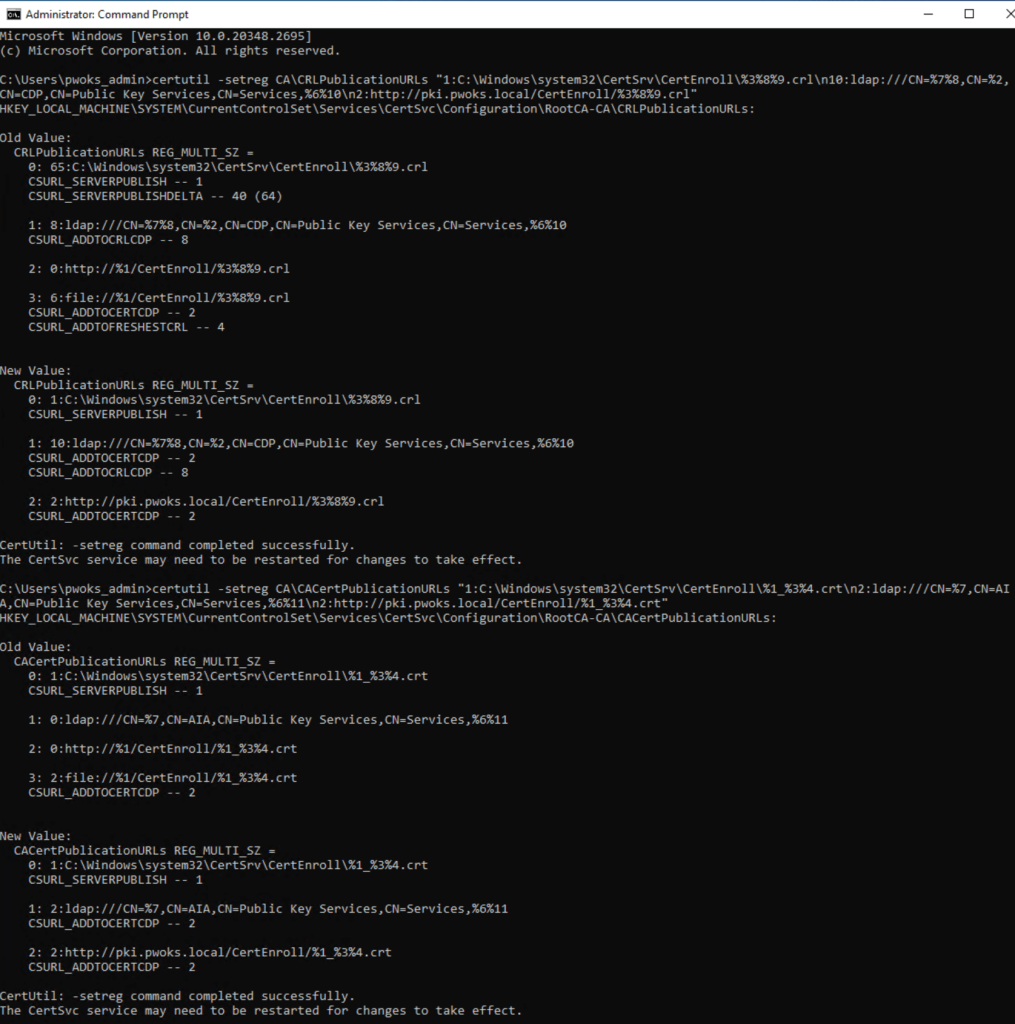
After running these commands, restart the CA service:
net stop CertSvc
net start CertSvc
Then publish the CRL:
certutil.exe -crl
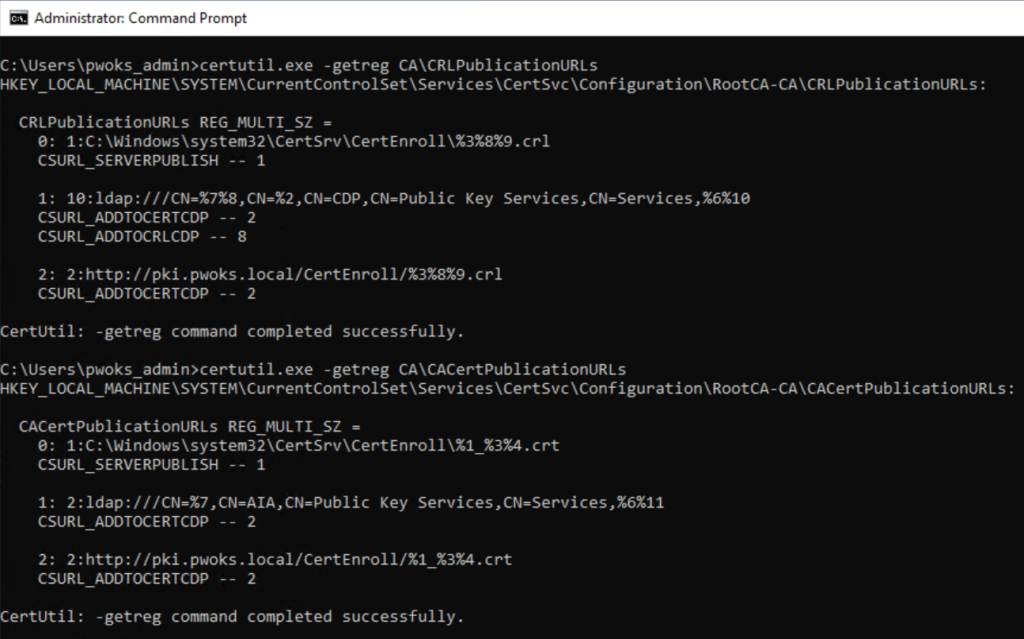
To verify the CDP and AIA settings, run:
certutil.exe -getreg CA\CRLPublicationURLs
certutil.exe -getreg CA\CACertPublicationURLs
To verify the CDP and AIA settings, run:
Lastly, open certsrv.msc, right-click your server, go to Properties > Extensions. Under CDP, ensure the “Include in CRLs. Clients use this to find Delta CRL locations” option is selected.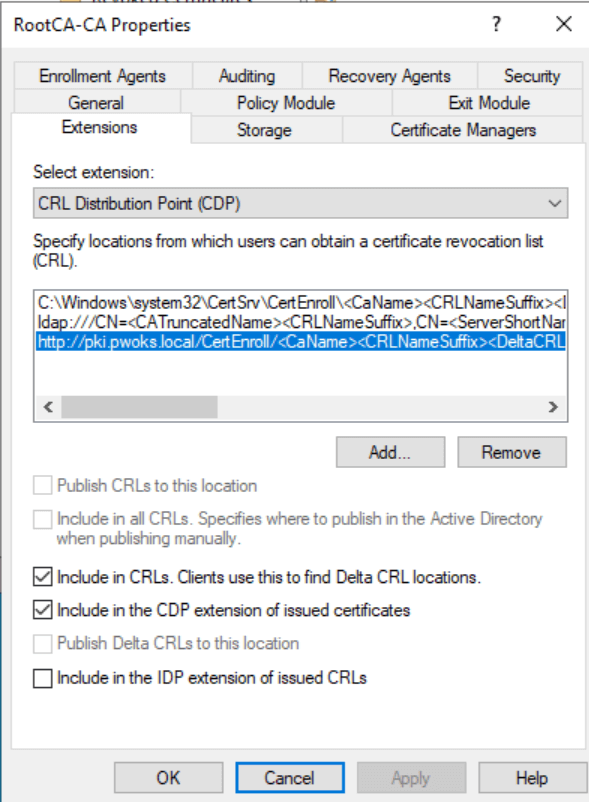
For AIA, ensure that “Include in the AIA extension of issued certificates” is checked.
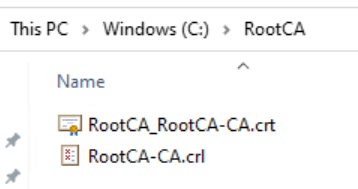
Exporting Root CA Certificate and CRL
We’re ready to export the Root CA certificate and CRL. Although this is a test environment and I’m using a file share, remember that in a production environment, the Root CA should be offline and not connected to the network.
Copy the contents of:
C:\Windows\System32\CertSrv\CertEnroll
to C:\RootCA. This folder should contain RootCA-CA.crl and RootCA_RootCA-CA.crt. If you’re using BitLocker, this is also a good time to back up the recovery key.
Transfer the RootCA folder to your Subordinate CA. If you’re using the network, disconnect it now.
Finally, reboot your Root CA as a precaution. At this point, the Root CA has no network connection and should remain that way until the entire PKI implementation is completed.
This concludes part 1. In the next part, we’ll set up the Subordinate CA, which will be a domain member and always online.
Do not turn off the Root CA until the entire PKI implementation is finished!